Route Based
How-to Configure a Route Based IPSec VPN
Navigate to Network & Security tab of the SDDC
- Click the Network & Security tab in the SDDC portal

Update Local Autonomous System Number in VMC
- Click VPN section under Network in sidebar
- Verify you’re in the Route Based tab in VPN section
- Click Edit Local ASN button

Edit Local ASN
- Enter the Local ASN chosen by the customer
- Click Save
Info
Selecting the Local ASN
By default the Local ASN for VMC is 65000. More often than not the customer will already be using this ASN on-prem and will want to select a different ASN for use in VMC. The customer’s networking team should be responsible for defining the ASN inside of VMC or validating the use of the default.

Add new Route Based VPN
- Click Add VPN button

Configure Route Based VPN in VMC
- Name: Enter a name for this VPN tunnel. This can be anything and should be named something to make it easy to understand what this tunnel is being used for.
- Local IP Address: Select Public IP from the drop down menu. Unless you’re configuring a VPN tunnel over a Private VIF using a Direct Connect you should never need to select Private IP.
- Remote Public IP: Enter the public IP address of the on-prem firewall being used to terminate this VPN tunnel. The customer should be able to provide you with this information and should already have been provided as part of the technical validation process if this is being done as part of a POC or Paid Pilot.
- BGP Local IP/Prefix Length: It is recommended to use a /30 CIDR from 169.254.0.0/16 subnet excluding following reserved addresses: 169.254.0.0-169.254.31.255, 169.254.101.0-169.254.101.3.
- BGP Remote IP: Enter the BGP IP address of the on-prem appliance which should be part of the subnet configured in step 4.
- BGP Neighbor ASN: Enter the BGP ASN of the on-prem appliance.
- Preshared Key: Have the customer define a strong password for the preshared key. Be aware that this is shown in plain text when configuring and is accessible as plain text in the CSP so do not choose something that overlaps with other passwords for security purposes.
- Click Save
Info
Additional Configuration Options
All other configuration options can be modified as needed based on customer requirements. Not every customer’s firewall will be able to support the default parameters and some customers may want to choose different options based on established corporate standards. You should NOT need to define any of the remaining configuration parameters but should allow the customer to define them based on feedback from their network or security teams internally.

Download VPN Configuration and Configure On-Prem VPN Appliance
- Expand the newly created Route Based VPN
- Click Download Config to download the VPN configuration. This configuration can be provided to the customer’s network or security team responsible for configuring the VPN tunnel on-prem to make it easier for them to mirror the config.
Warning
Pre-shared key is in plain text! Before emailing or sharing the VPN config it is usually a good idea to remove the pre-shared key from the text file for security purposes. Be sure to let the customer know this is stored in plain text so they can handle it according to any established infosec procedures they may have in their environment for storing or transferring this file.
Info
Differences with AWS Native
Unlike AWS native which will allow you to select your on-prem firewall appliance and auto generate a corresponding configuration, the config provided by VMC is in a generic format and the customer will be responsible for configuring their own appliances themselves.

Verify Status of VPN Tunnel
- Once the customer has properly configured their on-prem firewall for the VPN tunnel the status of the tunnel should change from Down to Success. If the tunnel does not come up have the customer validate their configuration as most times the problem will lie on their end. Be aware however that as of M9 the tunnel configuration defaults to Private IP for the Local IP Address in the tunnel configuration whereas previously this defaulted to Public IP, which can easily be missed. Aside from validating the configuration parameters matching the customer will be responsible for any troubleshooting of the configuration on their side.

View Routes
- Expand the VPN information
- Click View Routes

Verify Advertised Routes
- Verify the VPN is advertising the networks configured in VMC.
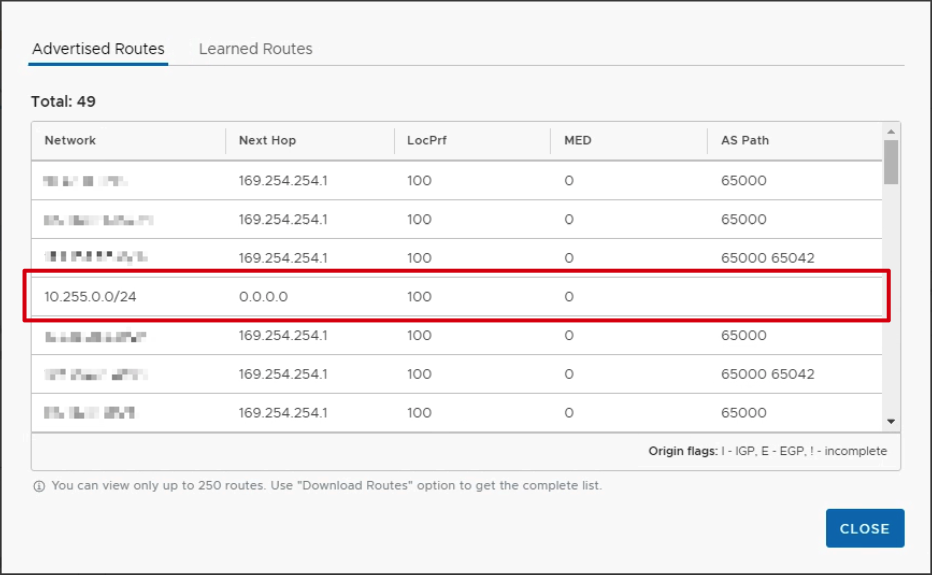
Verify Learned Routes
- Click the Learned Routes tab
- Verify the routes being advertised to VMC from the on-prem firewall
- Click Close

Feedback
Was this page helpful?
Glad to hear it! Please tell us how we can improve.
Sorry to hear that. Please tell us how we can improve.