Working with your SDDC
Viewing your SDDC
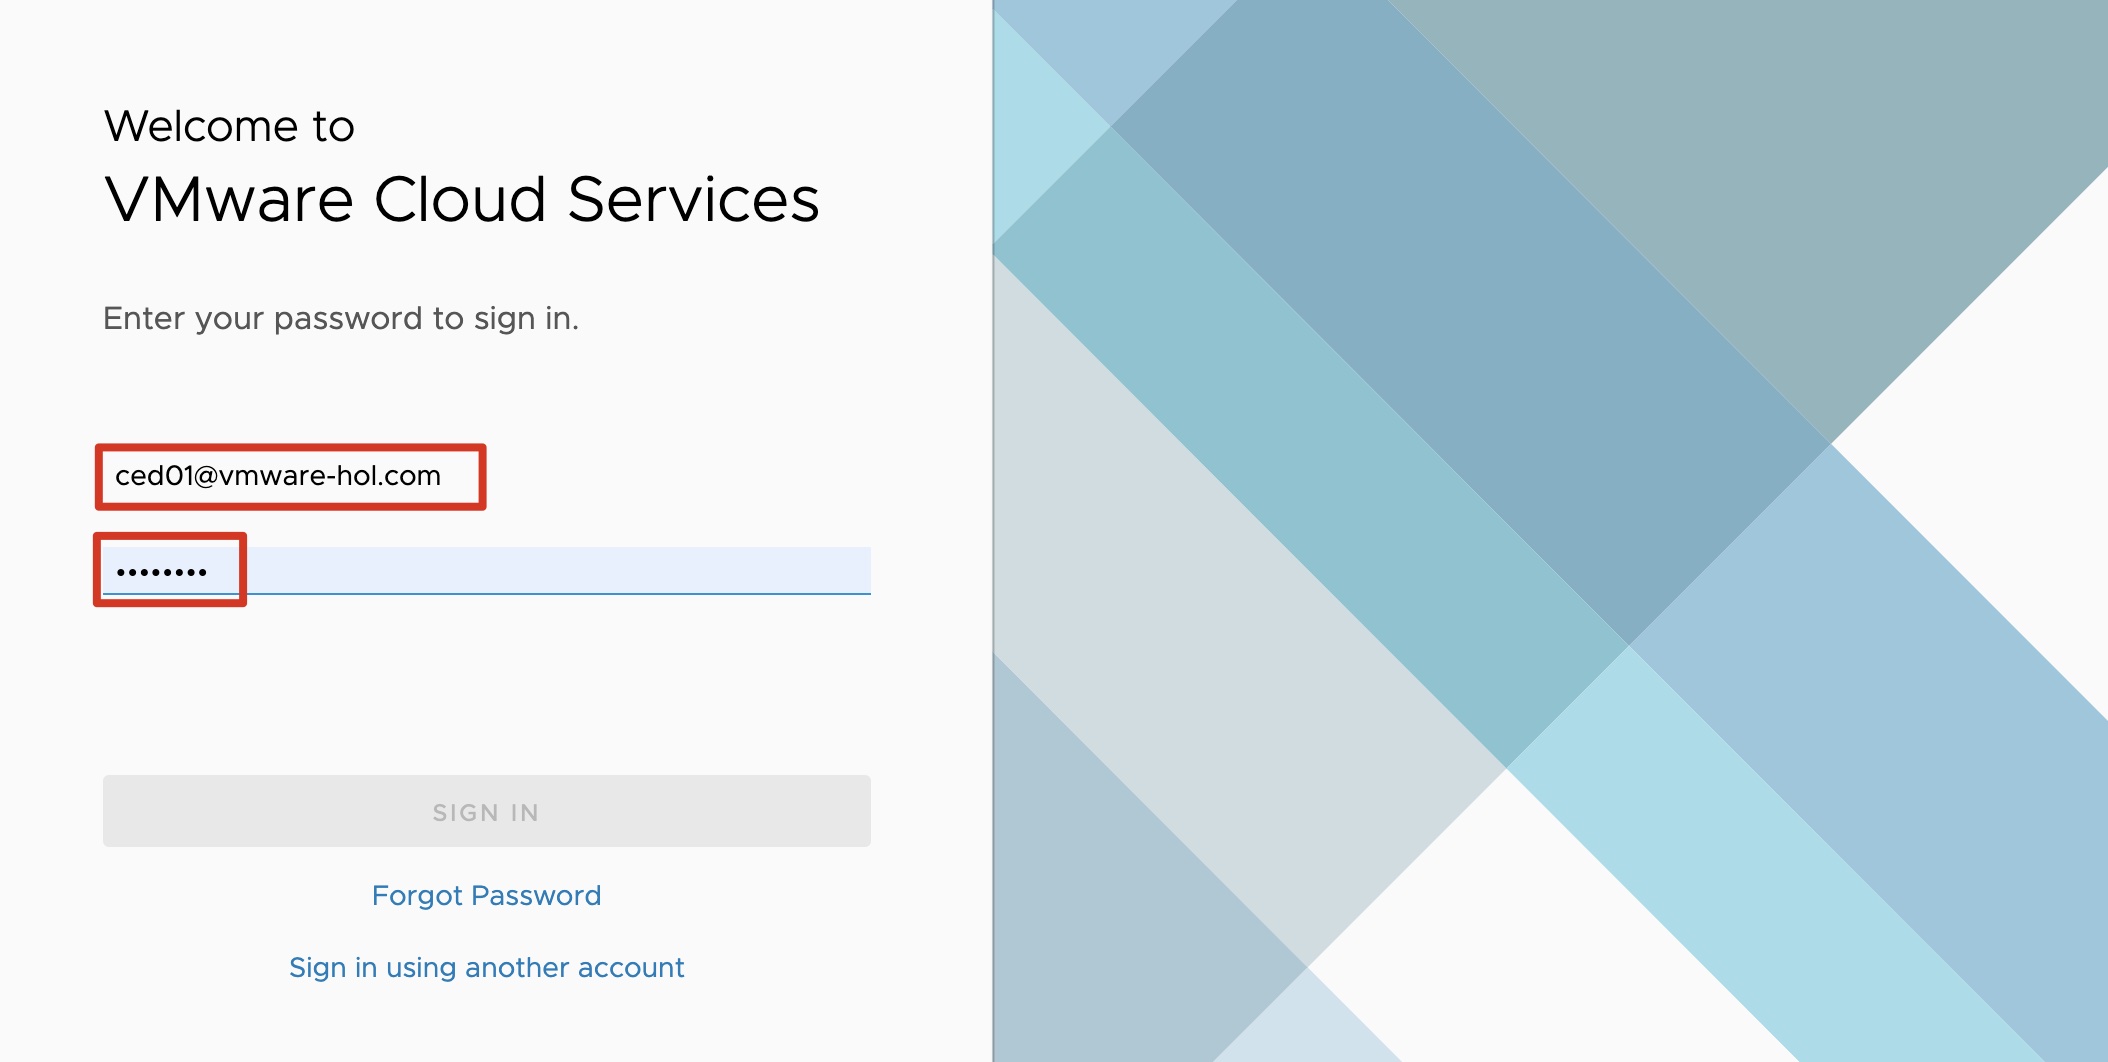
Access VMware Cloud on AWS console using https://vmc.vmware.com and use your assigned login credentials ced##@vmware-hol.com.
After you login, you should see two single-node SDDC’s in the user interface following the naming format Student-##. An SDDC is a fully deployed environment including vSphere, NSX, vSAN and vCenter Server. Deployment of a fully configured SDDC takes about 90 minutes so for the purposes of this lab, we have already deployed it for you.
This SDDC is in the same state it would be if you have deployed it.
Let’s take a look at the SDDC properties.
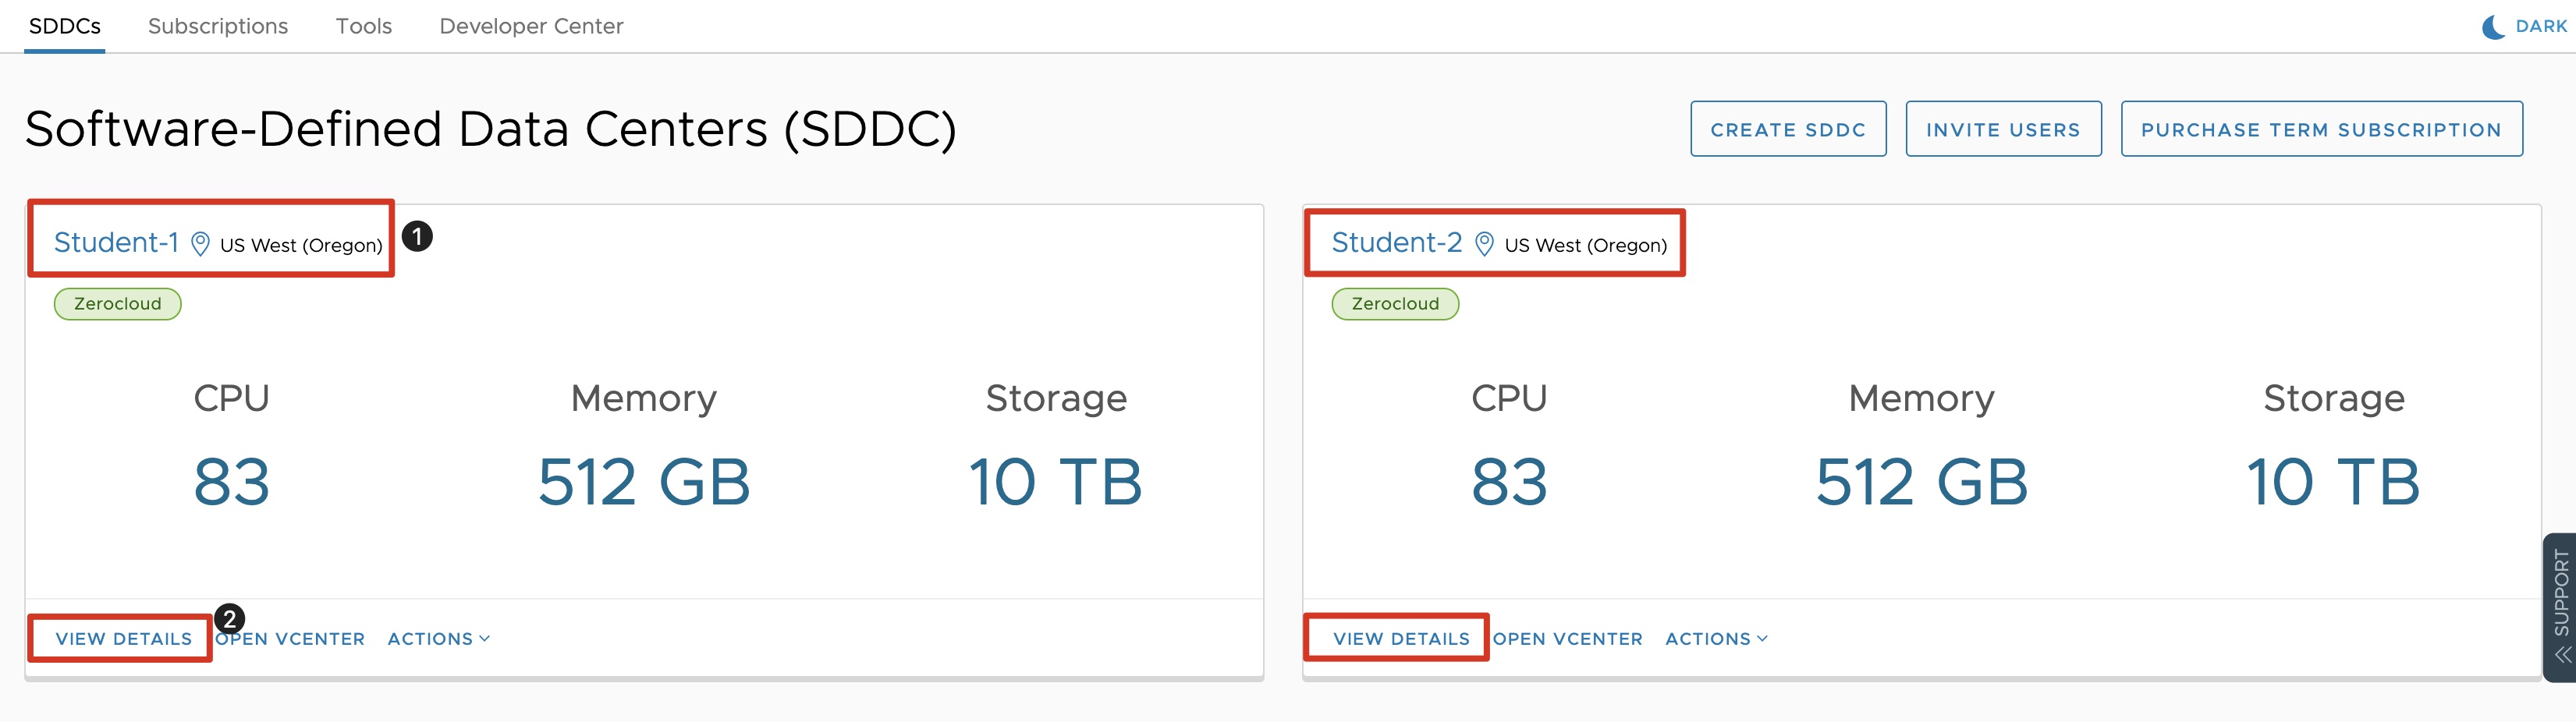
- First identify your SDDC that is assigned to you (Student-##).
- Click on View Details to open the SDDC properties.
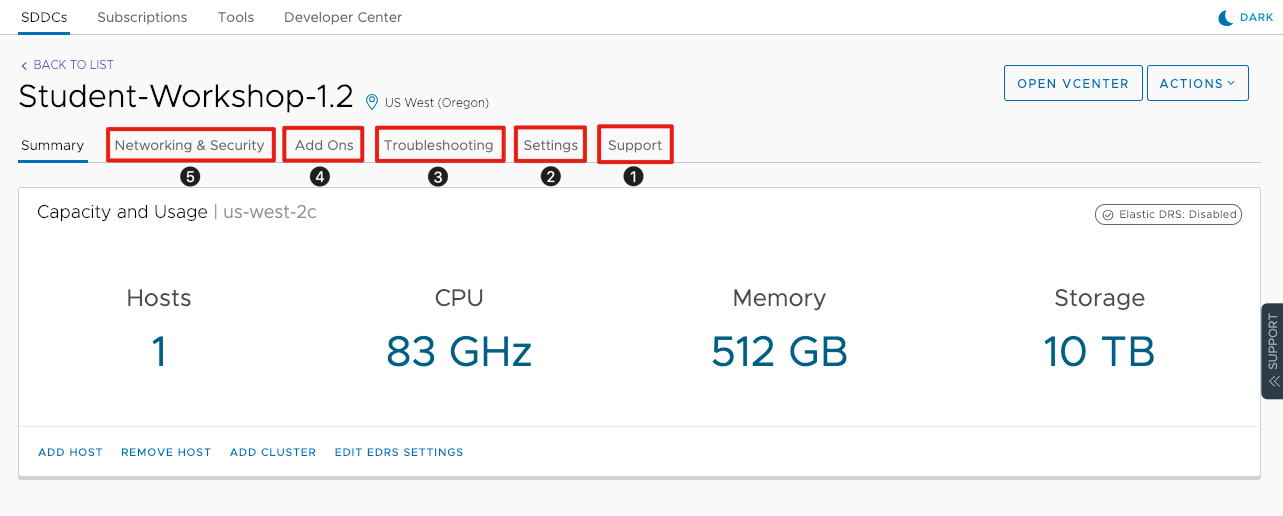
You will start with the Summary of the SDDC. There are a number of other tabs available as follows:
- Support: You can contact Support with your SDDC ID, Org ID, vCenter Private and Public IPs and the date of your SDDC Deployment.
- Settings: Gives you access to your vSphere Client (HTML5), vCenter Server API, PowerCLI Connect, vCenter Server and reviews your Authentication information.
- Troubleshooting: Allows you to run network connectivity tests to ensure all necessary access is available to perform select use cases.
- Add Ons: Here you will find Add On services for your VMware Cloud on AWS environment like Hybrid Cloud Extension and VMware Site Recovery.
- Networking & Security: Provides a full diagram of the Management and Compute Gateways. This is where you can configuration locgical networks, VPN’s and firewall rules. We will cover this in more detail later. Click on Networking & Security to proceed to the next article to learn more about VMware Cloud on AWS Network and Security Configuration.
Create a Logical Network
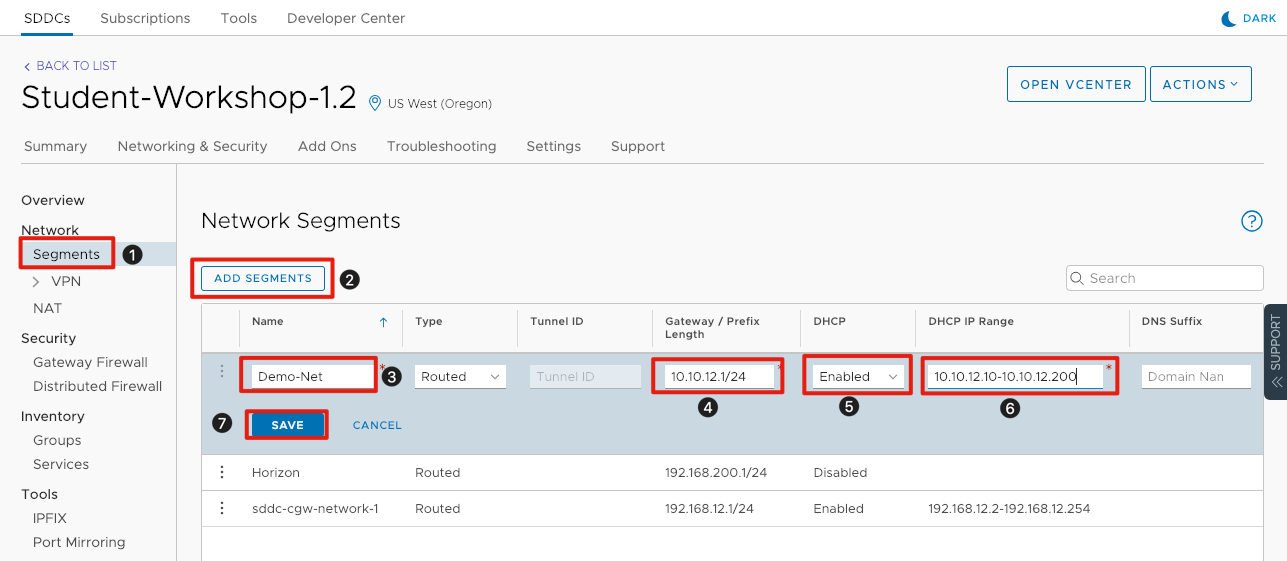
From the previous article, you should see the Network & Security information for the SDDC. VMware Cloud on AWS allows you to quickly and easily create new logical network segments on demand. Let’s create a new network segment in the SDDC.
- Click the Networking & Security tab, then click on Segments to show all of the existing network segments.
- Click on Add Segments to create a new network segment.
- Enter Demo-Net for the Name of the new network segment.
- For the Gateway/Prefix Length enter 10.10.xx.1⁄24 (xx depicts your student number). This represents the default gateway of the network and the prefix length of the network. For more details on IP addressing see below.
- For DHCP, click the down arrow and select Enabled to enable DHCP on the network.
- Enter 10.10.xx.10-10.10.xx.200 for the DHCP IP Range. This is the range of IP addresses the DHCP server will grant to workloads attached to the network.
- Click Save to save the logical network.
Note: Make sure you leave the default of Routed for Type and do not enter anything for the DNS suffix.
Note - CIDR Notation
CIDR notation is a compact representation of an IP address and its associated routing prefix. The notation is constructed from an IP address, a slash(‘/’) character, and a decimal number. The number is the count of leading bits in the routing mask, traditionally called the network mask. The IP address is expressed according to the standards of IPv4 or IPv6.
The address may denote a single, distinct interface address or the beginning address of an entire network. The maximum size of the network is given by the number of addresses that are possible with the remaining, least-significant bits below the prefix. The aggregation of these bits is often called the host identifier.
For example:
- 192.168.100.14⁄24 represents the IPV4 address 192.168.100.14 and its associated routing prefix 192.168.100.0, or equivalently, its subnet mask 255.255.255.0, which has 24 leading 1-bits.
- The IPV4 block 192.168.100.0/22 represents the 1024 IPV4 addresses from 192.168.100.0 to 192.168.103.255.
Verify Network Segment Configuration
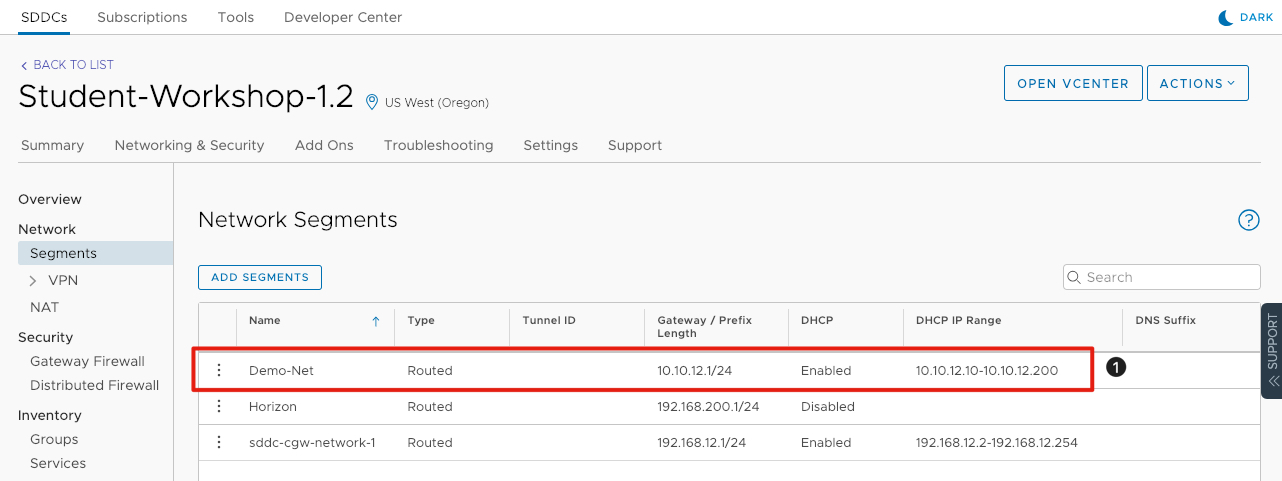
- Verify the network segment was added correctly. Your information should match the highlighted area above.
Configure Firewall Rule for vCenter Access
By default, all inbound firewall rules are set to Deny in VMware Cloud on AWS. In order to access vCenter server, we will need to configure a firewall rule allowing inbound access.
Note: In most enterprise environments, you would create VPN or Direct Connect VIF to allow limited access firewall rules to vCenter. In this environment, we will open it to any IP address on the internet which is not recommended.
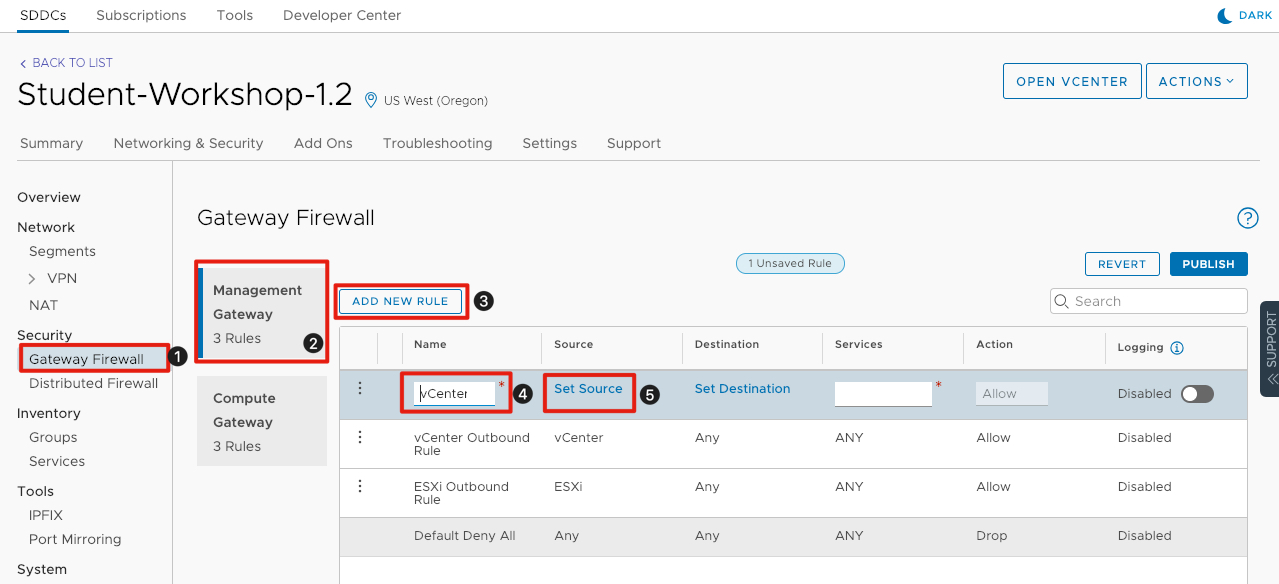
- Click on Gateway Firewall on the lefthand side of the screen.
- If it is not already selected, click on Management Gateway to create a firewall rules that allow access to management components in the SDDC.
- Click Add New Rule to add a new rule to the edge gateway.
- For the Name enter vCenter Inbound Rule.
- Click Set Source to define the source for the firewall rule.
Select the Firewall Rule Source
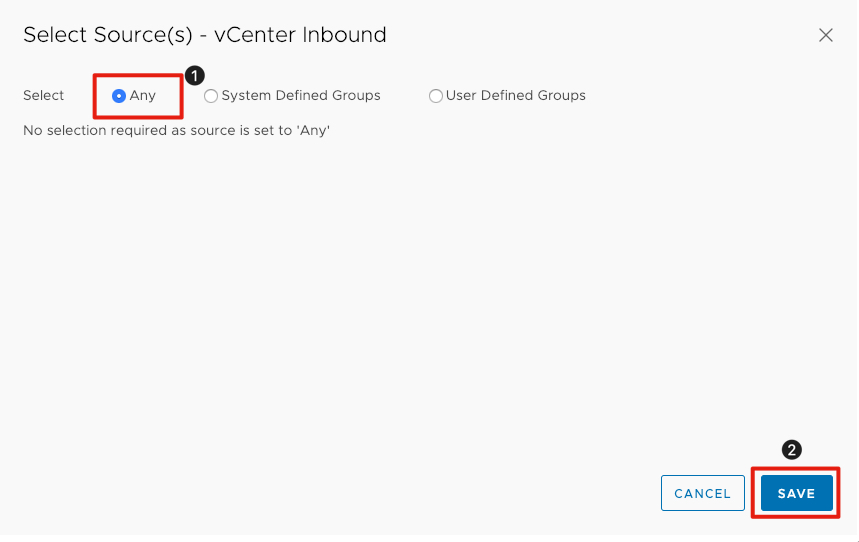
- Click the radio button next to Any.
- Click Save to save the source information in the rule.
Configure Firewall Rule for vCenter Access (Continued)
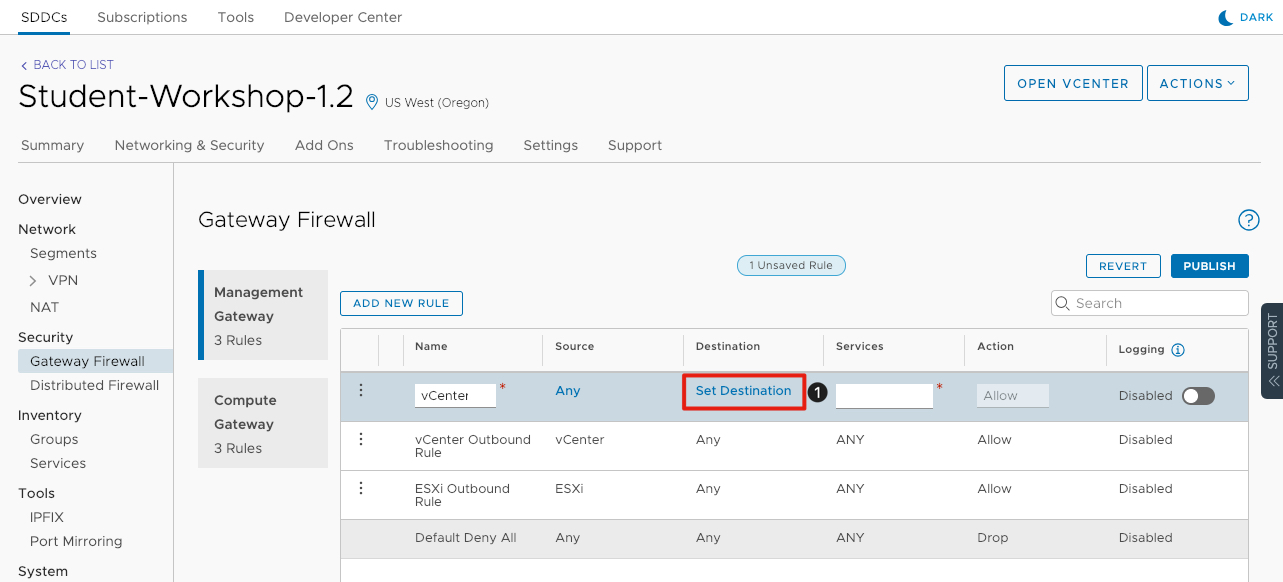
- Click Set Destination to launch a new window to set the destination for the rule.
Select the Firewall Rule Destination
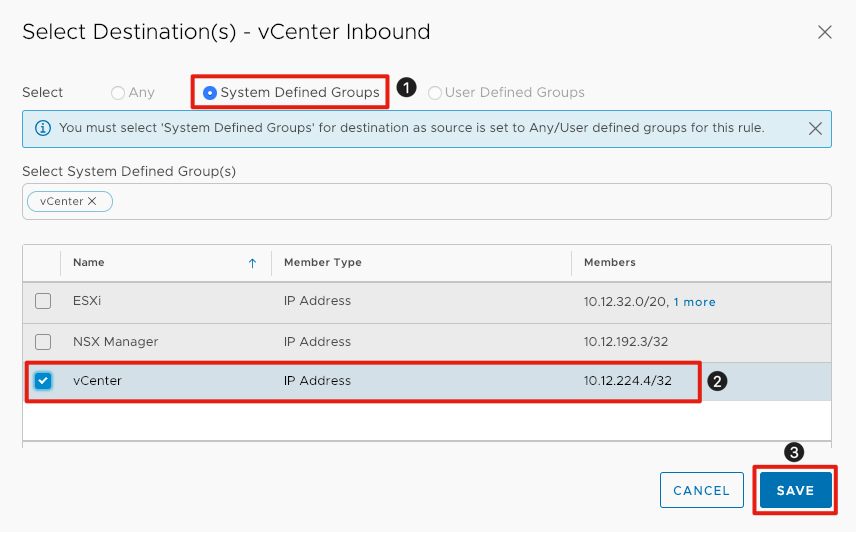
- Click the radio button next to System Defined Groups.
- Select the checkbox next to vCenter.
- Click Save to save the destination information in the rule.
Configure Firewall rule for vCenter Access (Contined)

Continue configuring the vCenter Inbound Rule:
- Click box below Services and select HTTPS (TCP 443) to allow SSL access to the vCenter server.
- Publish the rules by clicking Publish button to activate the firewall rule.
vCenter should now be accessible from anywhere in the internet. in the next section, we will access vCenter HTML5 client to being configuring virtual machines.
Log into VMware Cloud on AWS vCenter
The settings to connect to the vCenter server associated with the SDDC is available on the setting tab for the SDDC. Let’s connect to the vCenter server and login.
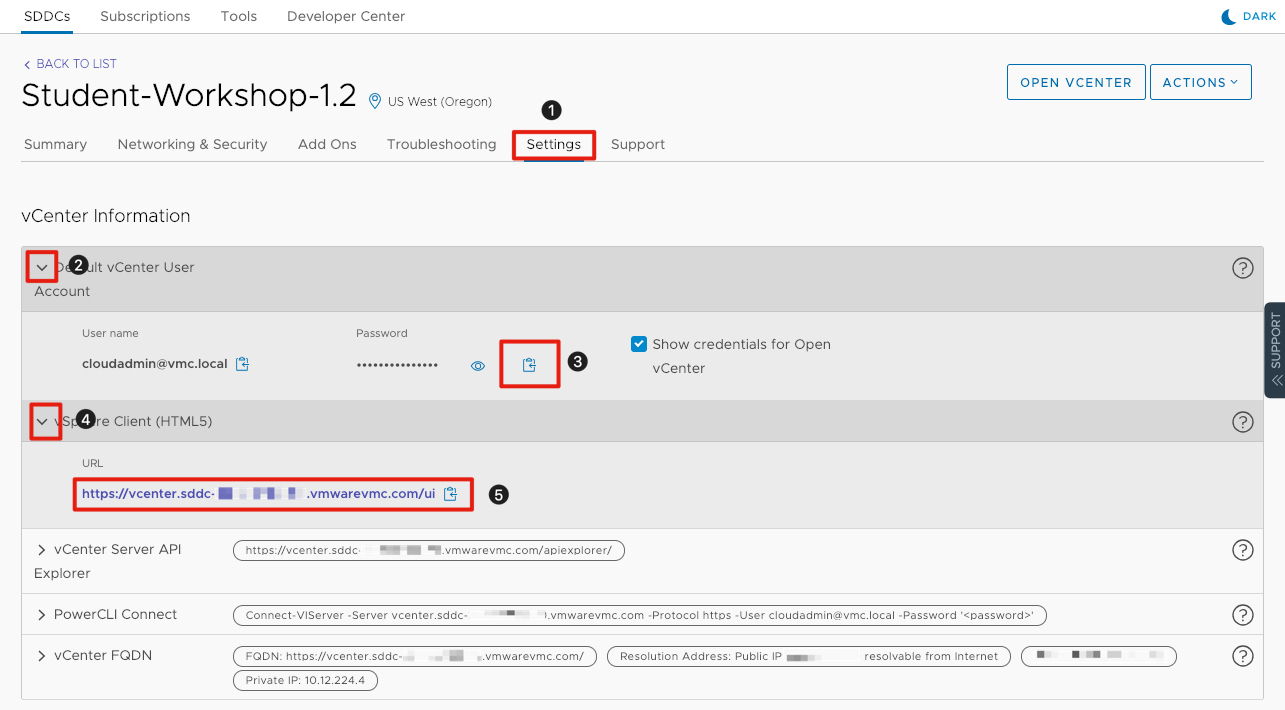
- Click on the Settings tab for the SDDC we configured in the last lesson.
- Click the arrow next to Default vCenter User Account to expose the login details. In this lab we will use the default cloudadmin@vmc.local user.
- Copy the password by clicking the two squares next to the password. This will copy it to the consoles clipboard.
- Click the arrow next to vSphere Client (HTML5) to expose the URL for vCenter.
- Click the URL link to open the vSphere Client in another tab.
NOTE: If you experience any login issues below, you can click the two boxes next to the URL below to paste the URL into an incognito window. This should not be needed normally.
Login to the vSphere Client (HTML5)
To login to the vSphere Client (HTML5):
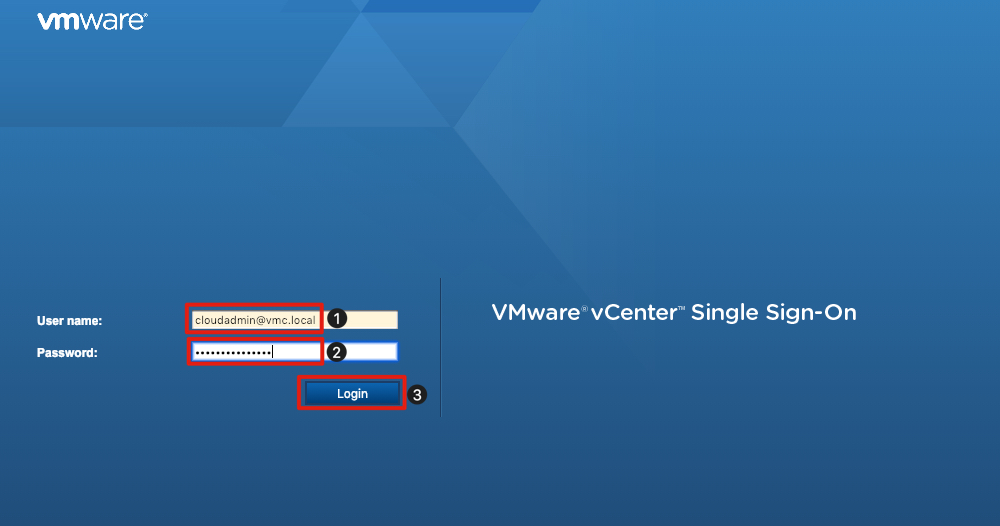
- In the User name field enter cloudadmin@vmc.local
- Right-click in the Password field and paste the password copied in the previous step.
- Click Login.
vSphere Client (HTML5)

You are now logged in to your VMware Cloud on AWS vCenter Server as cloudadmin@vmc.local user.
Create Content Library
Content libraries are container objects for VM templates, vApp templates, and other types of files like ISO images.
You can create a content library in the vSphere Client (HTML5), and populate it with templates, which you can use to deploy virtual machines or vApps in your VMware Cloud on AWS environment or if you already have a Content Library in your on-premises data center, you can use the Content Library to import content into your SDDC.
You can create two types of libraries: local or subscribed library.
Local Libraries
You use a local library to store items in a single vCenter Server instance. You can publish the local library so that users from other vCenter Server systems can subscribe to it. When you publish a content library externally, you can configure a password for authentication.
VM templates and vApps templates are stored as OVF file formats in the content library. You can also upload other file types, such as ISO images, text files, and so on, in a content library.
Subscribed Libraries
You subscribe to a published library by creating a subscribed library. You can create the subscribed library in the same vCenter Server instance where the published library is, or in a different vCenter Server system. In the Create Library wizard you have the option to download all the contents of the published library immediately after the subscribed library is created, or to download only metadata for the items from the published library and later to download the full content of only the items you intend to use.
To ensure the contents of a subscribed library are up-to-date, the subscribed library automatically synchronizes to the source published library on regular intervals. You can also manually synchronize subscribed libraries.
You can use the option to download content from the source published library immediately or only when needed to manage your storage space.
Synchronization of a subscribed library that is set with the option to download all the contents of the published library immediately, synchronizes both the item metadata and the item contents. During the synchronisation the library items that are new for the subscribed library are fully downloaded to the storage location of the subscribed library.
Synchronization of a subscribed library that is set with the option to download contents only when needed synchronizes only the metadata for the library items from the published library, and does not download the contents of the items. This saves storage space. If you need to use a library item you need to synchronize that item. After you are done using the item, you can delete the item contents to free space on the storage. For subscribed libraries that are set with the option to download contents only when needed, synchronizing the subscribed library downloads only the metadata of all the items in the source published library, while synchronizing a library item downloads the full content of that item to your storage.
If you use a subscribed library, you can only utilize the content, but cannot contribute with content. Only the administrator of the published library can manage the templates and files.
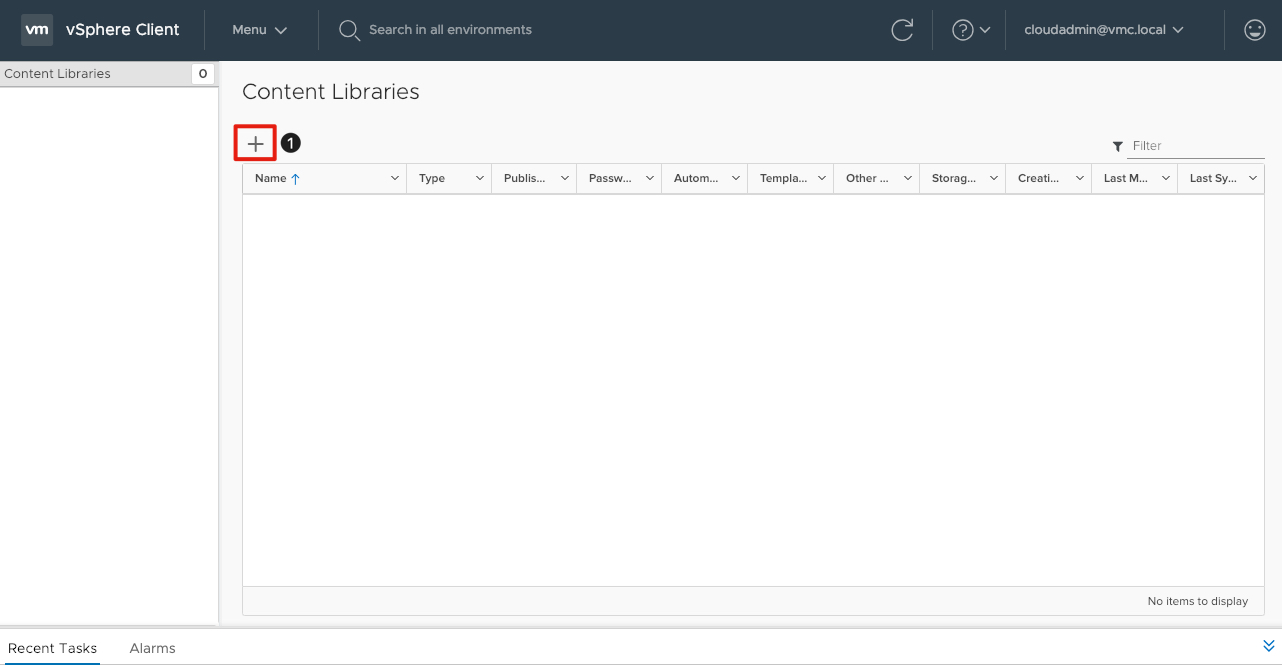
Access Content Libraries in the vSphere Client
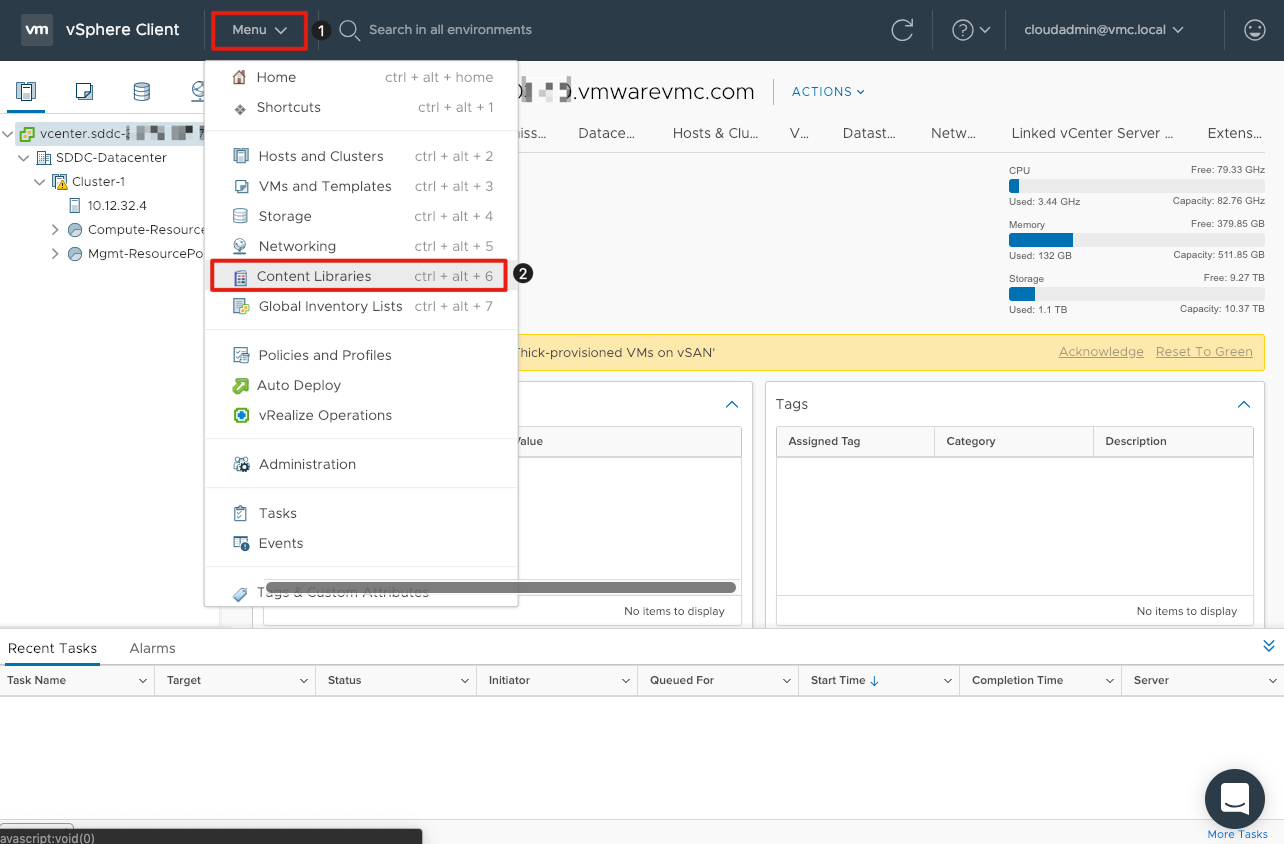
- Click on Menu
- Click on Content Libraries
Subscribe to an existing Content Library
- In your Content Library window, click the + (plus) sign to add a new Content Library.
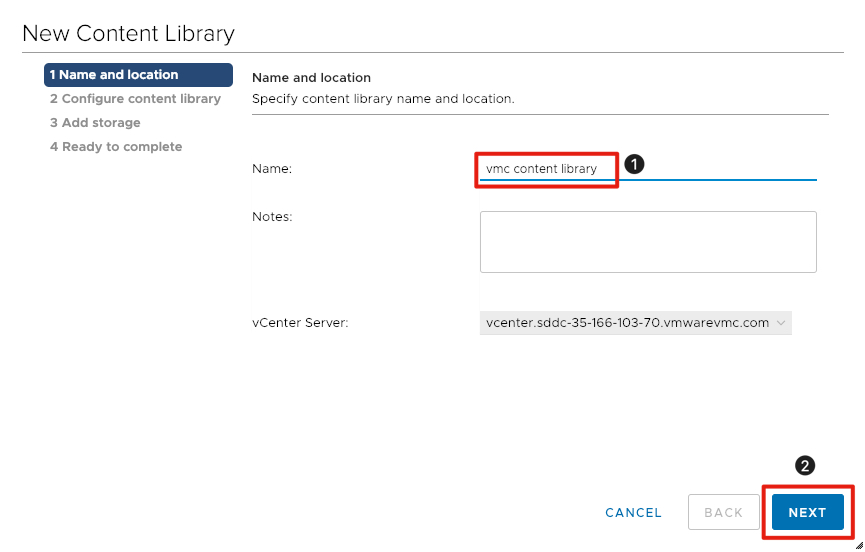
- Enter VMC Content Library for the Name of the library.
- Click the Next button.
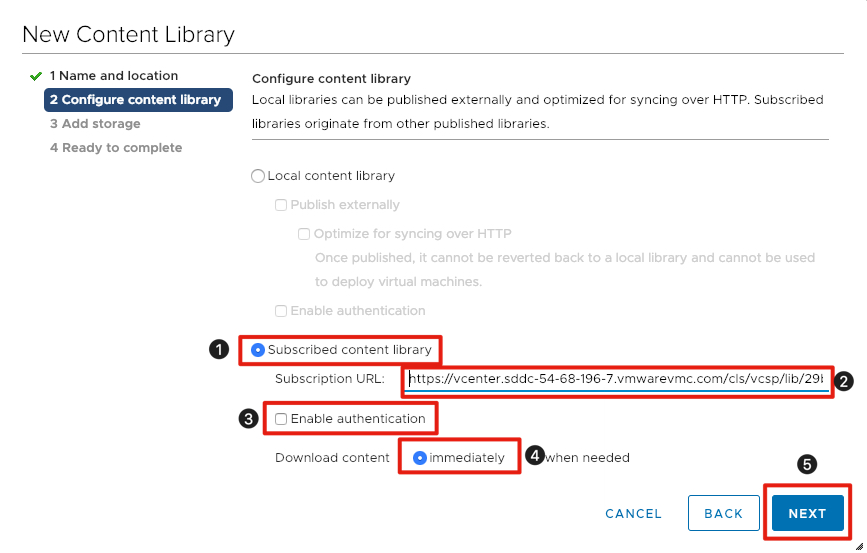
- Select the radio button next to Subscribed content library.
- Under Subscription URL enter the following: https://vmc-elw-vms.s3-accelerate.amazonaws.com/lib.json
- Leave the checkbox unchecked next to Enable Authentication.
- Make sure Download content is set to immediately.
- Click Next to continue.
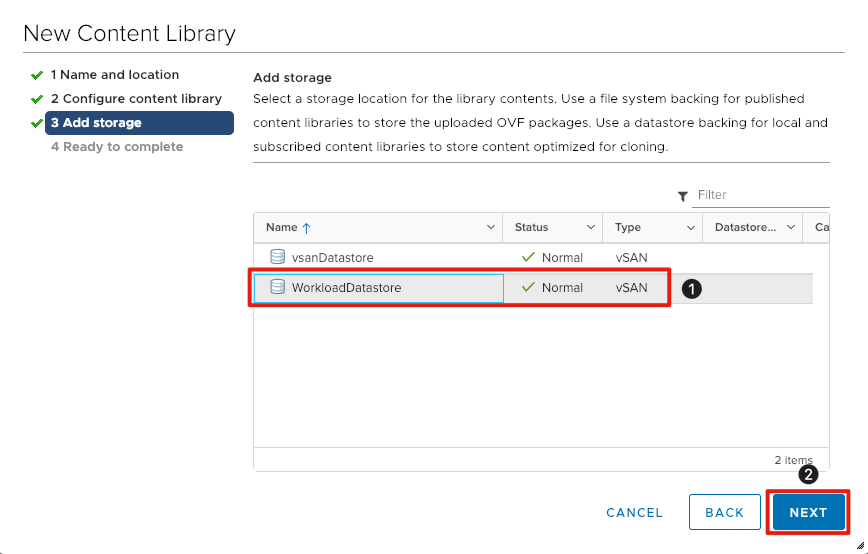
- Click on WorkloadDatastore for content library storage.
- Click the Next button.
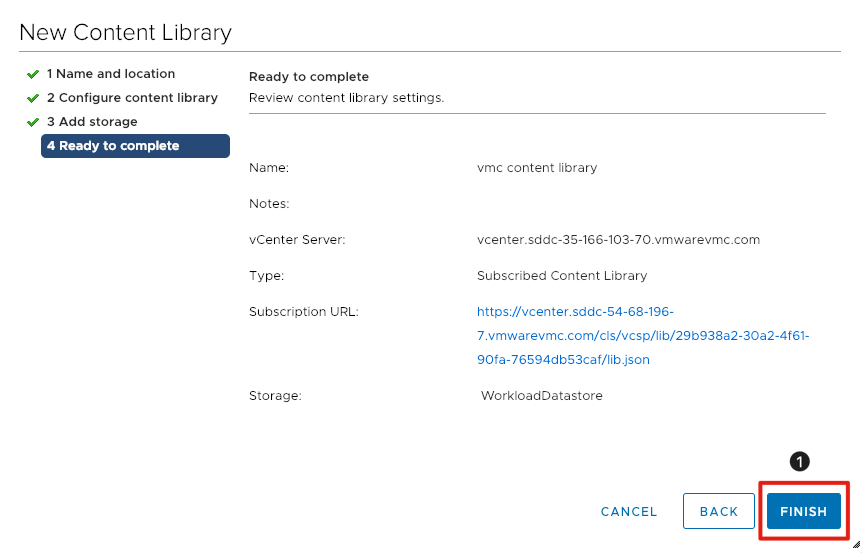
- Click the Finish button.
Note: Depending the size and number of templates it can take a while to sync the content. This content library should only take a few minutes to synchronize.
Create Linux Customization Specification
When you clone a virtual machine or deploy a virtual machine from a template, you can customize the guest operating system of the virtual machine to change properties such as the computer name, network settings, and license settings.
Customizing guest operating systems can help prevent conflicts that can result if virtual machines with identical settings are deployed, such as conflicts due to duplicate computer names.
You can specify the customization settings by launching the Guest Customization wizard during the cloning or deployment process. Alternatively, you can create customization specifications, which are customization settings stored in the vCenter Server database. During the cloning or deployment process, you can select a customization specification to apply to the new virtual machine.
Use the Customization Specification Manager to manage customization specifications you create with the Guest Customization wizard.
Navigate to Customization Specifications
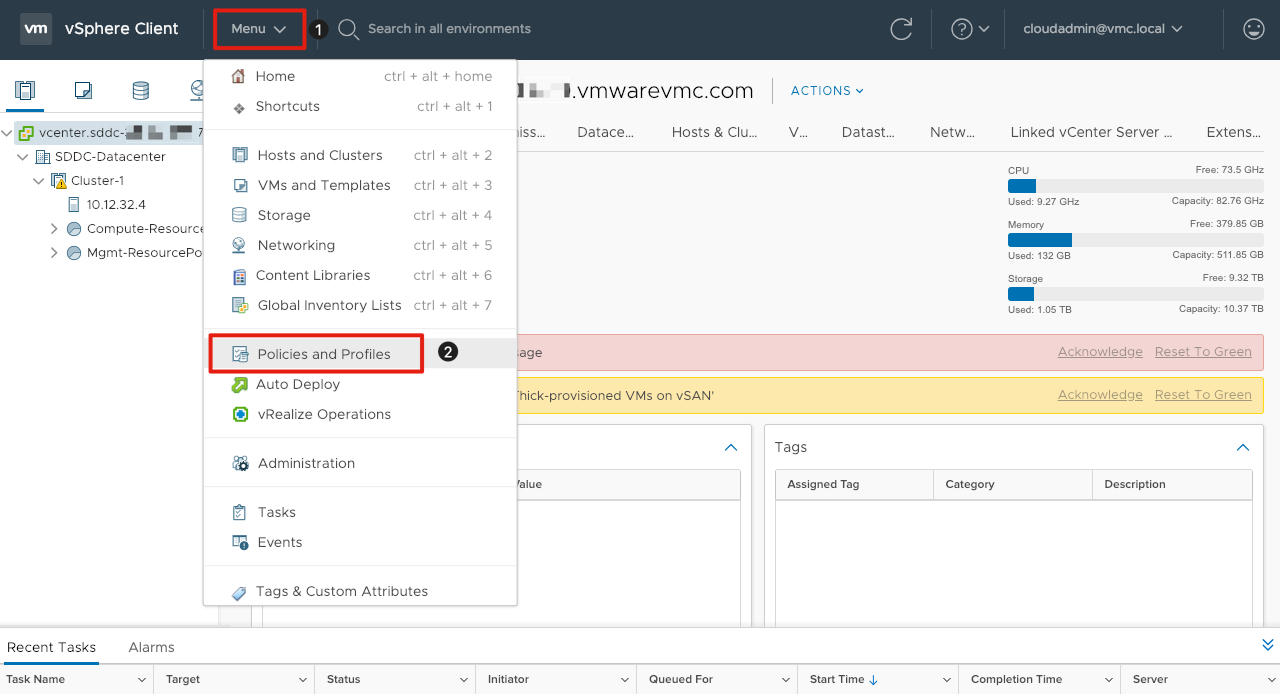
- Click Menu.
- Click on Policies and Profiles.
Add a new VM Customization Specification
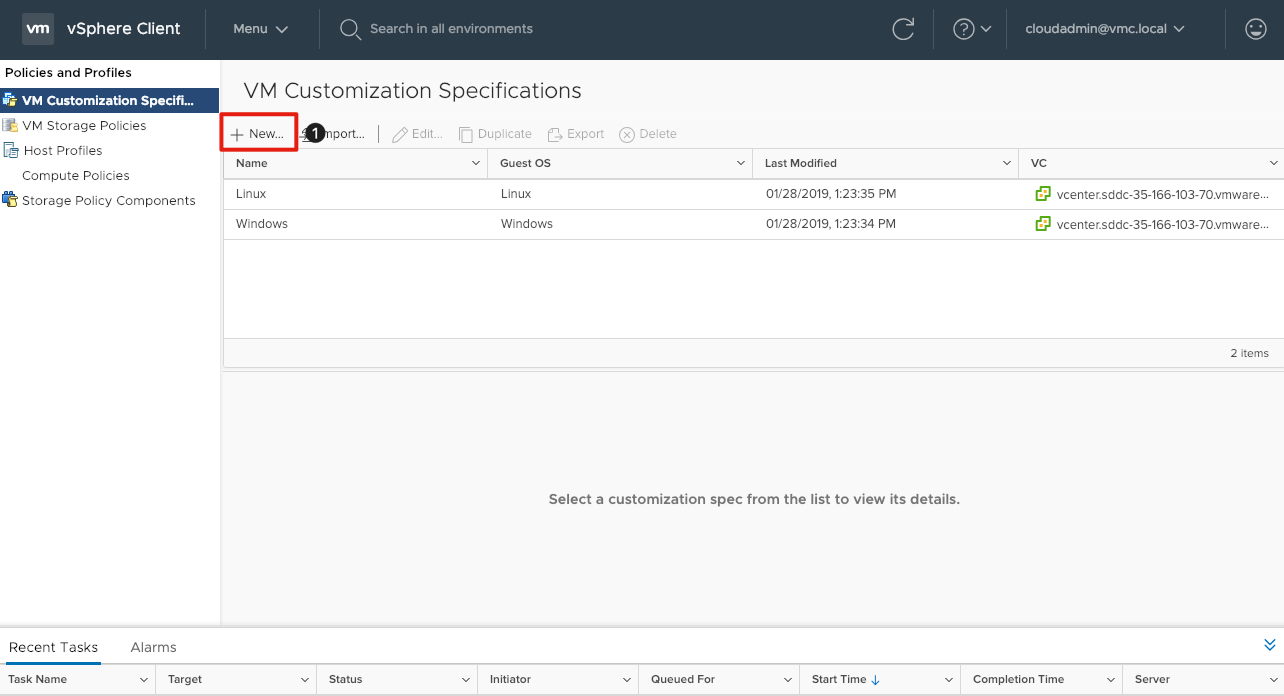
- Click on + New to add a new Linux Customization Specification.
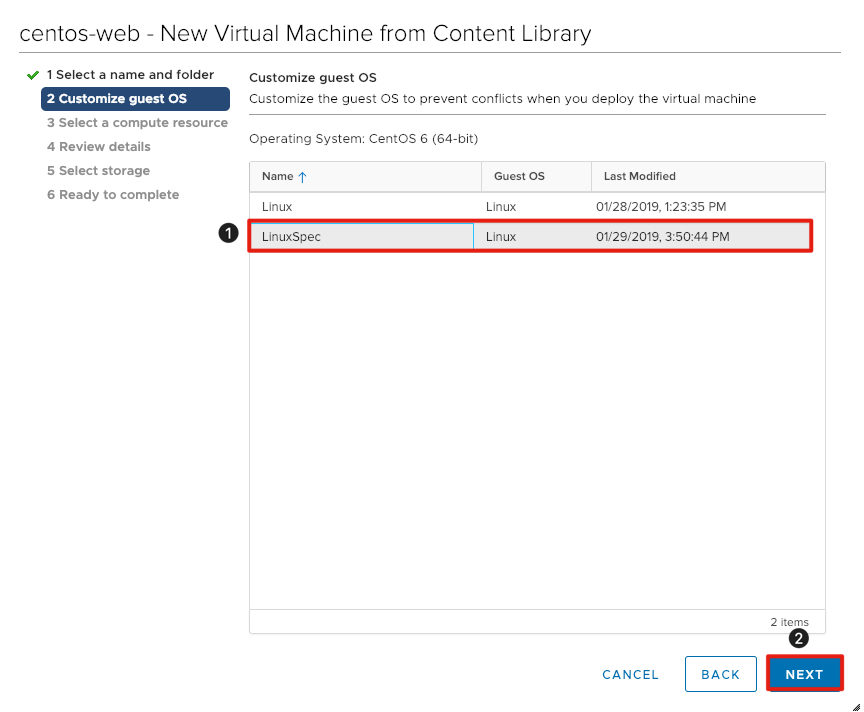
Define Customization Specification Details
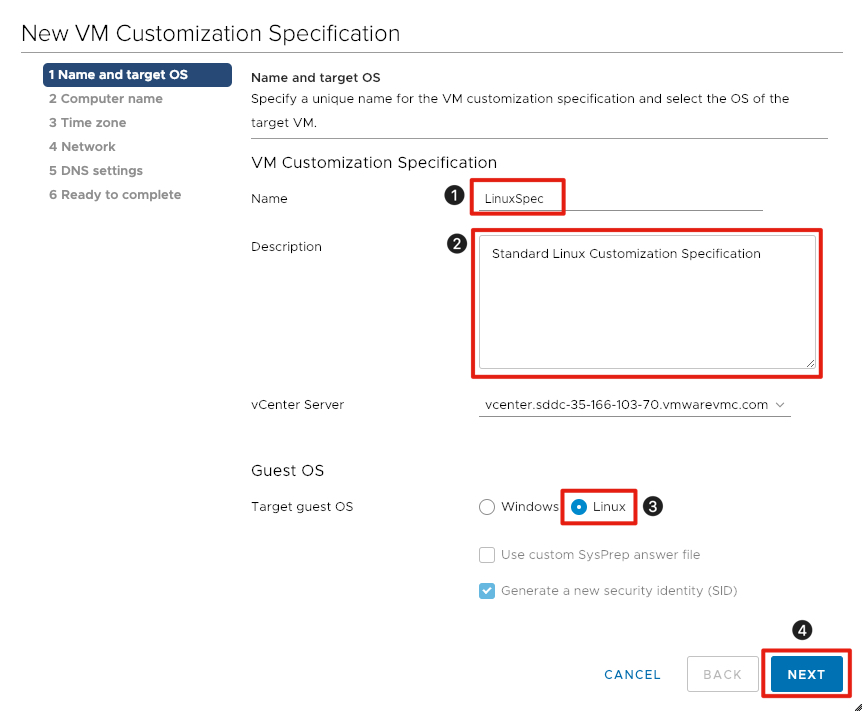
- Enter a Name for the Linux Customization Specification (LinuxSpec in this example).
- Optionally enter a Description.
- Select the radio button for Linux next to Target guest OS.
- Click the Next button to continue.
Define Specification Naming Standard
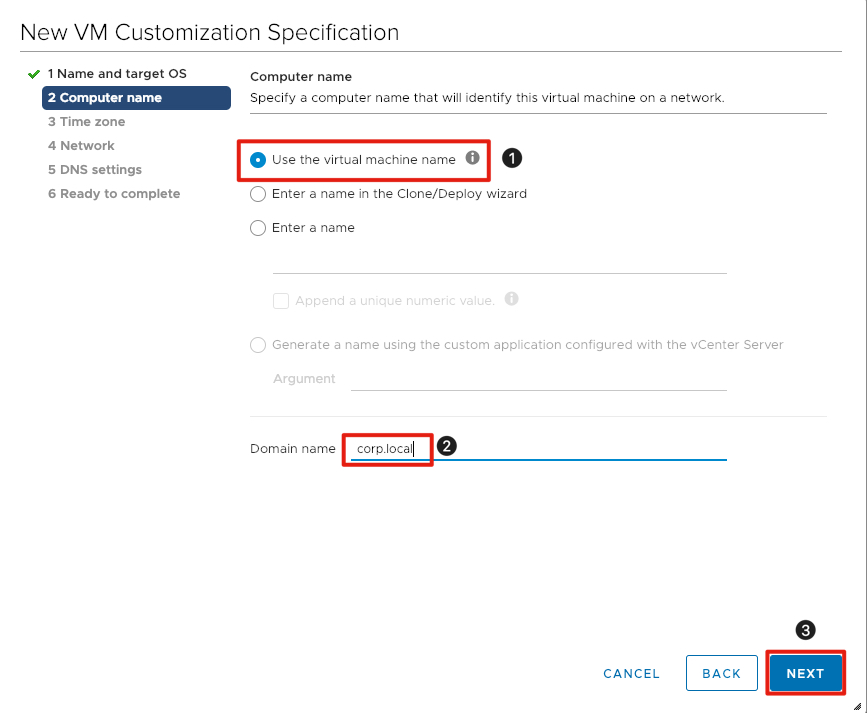
- Click the radio button next to Use the virtual machine name.
- For Domain name enter corp.local.
- Click the Next button to continue.
Select Time Zone
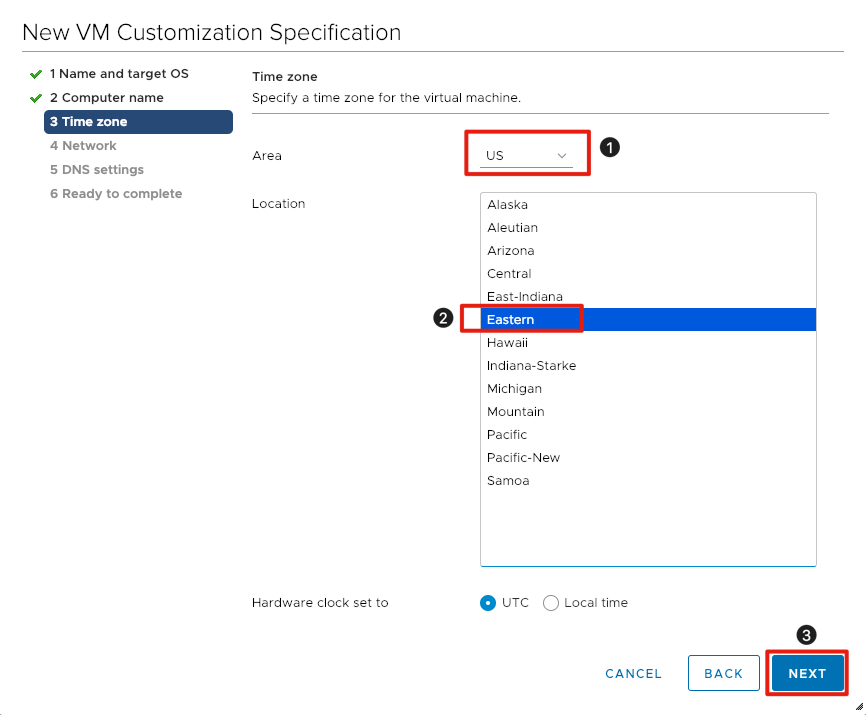
- Select the appropriate Area by clicking on the arrow next to the dropdown field.
- Select the appropriate Location.
- Click the Next button to continue.
Select Network Settings
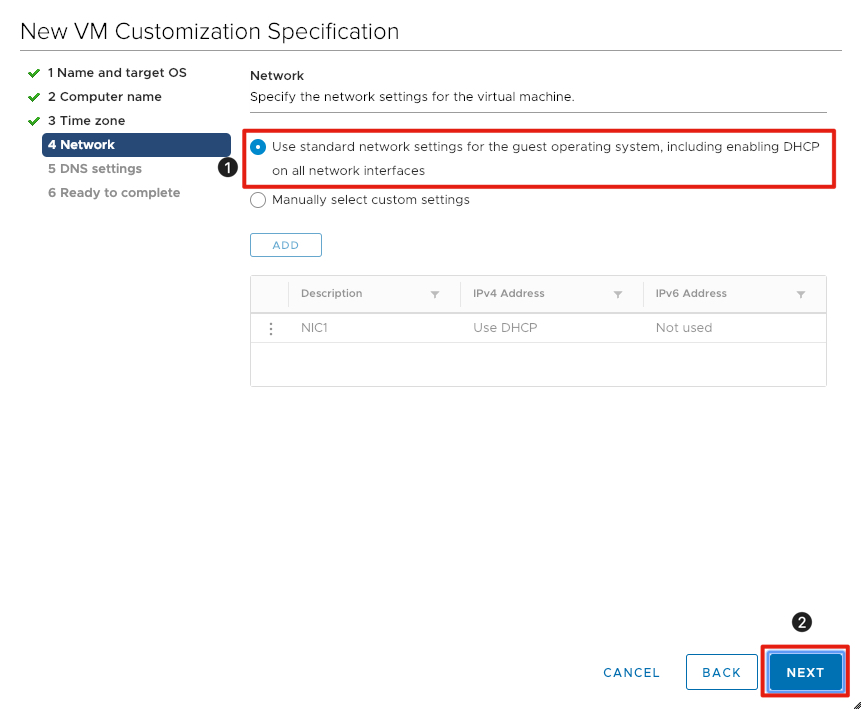
- Ensure the radio button next to Use standard network settings for the guest operating system, including enabling DHCP in all network interfaces is selected.
- Click Next to continue.
Enter DNS Settings
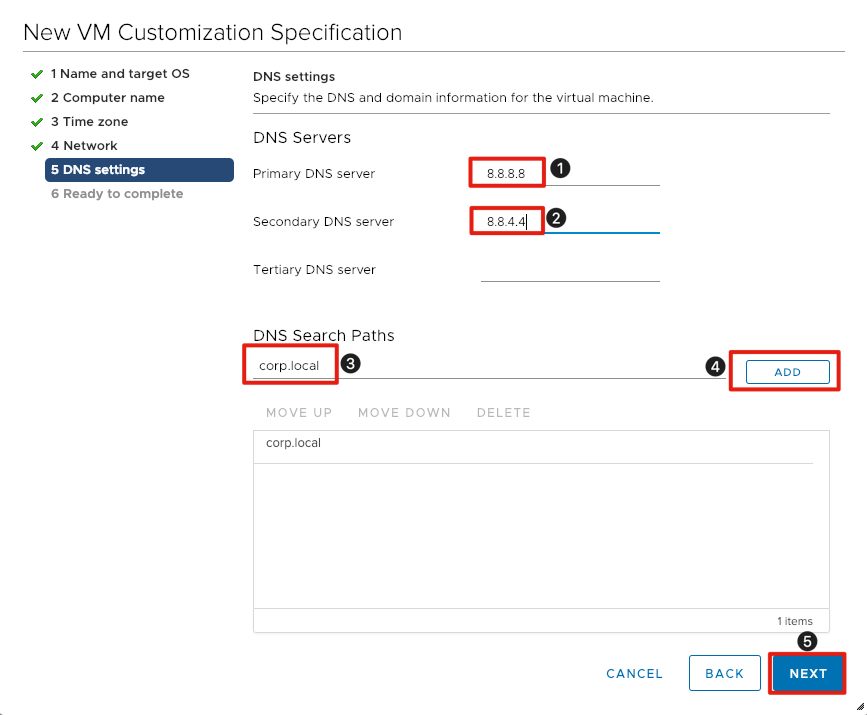
- Enter 8.8.8.8 for the Primary DNS server.
- Enter 8.8.4.4 for the Secondary DNS server.
- For the DNS Search paths enter corp.local.
- Click the Add button to add the corp.local domain to the DNS search path.
- Click Next to continue.
Finish Creating the Customization Spec

- Review your entries and click on the Finish button.
Customization Spec Created
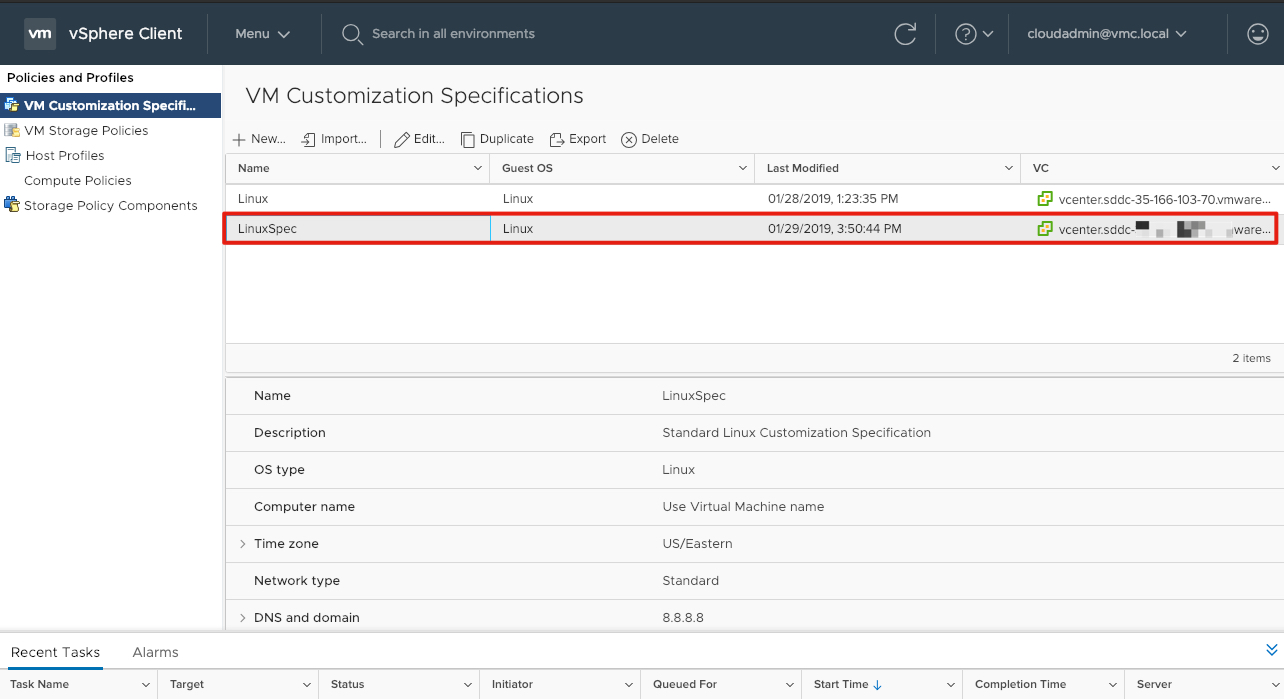
Congratulations! You have successfully created your VM Customization Spec for your Linux VM’s. You can also Export (Duplicate), Edit, Import, and Export a VM Customization Spec.
Deploy a Virtual Machine
In the vSphere client window already opened, deploy a template from the content library:
- Click Menu.
- Click on Content Libraries.
Select Content Library
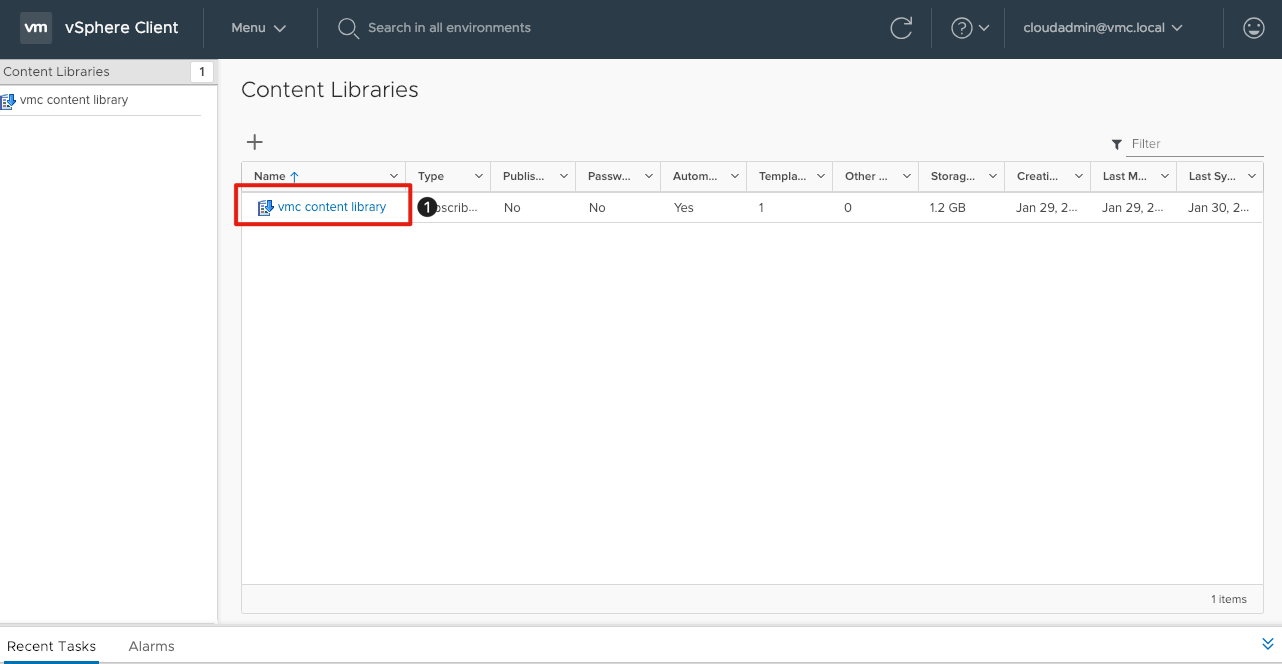
- Click on the VMC Content Library that was previously synchronized.
Deploy a New Virtual Machine from Template
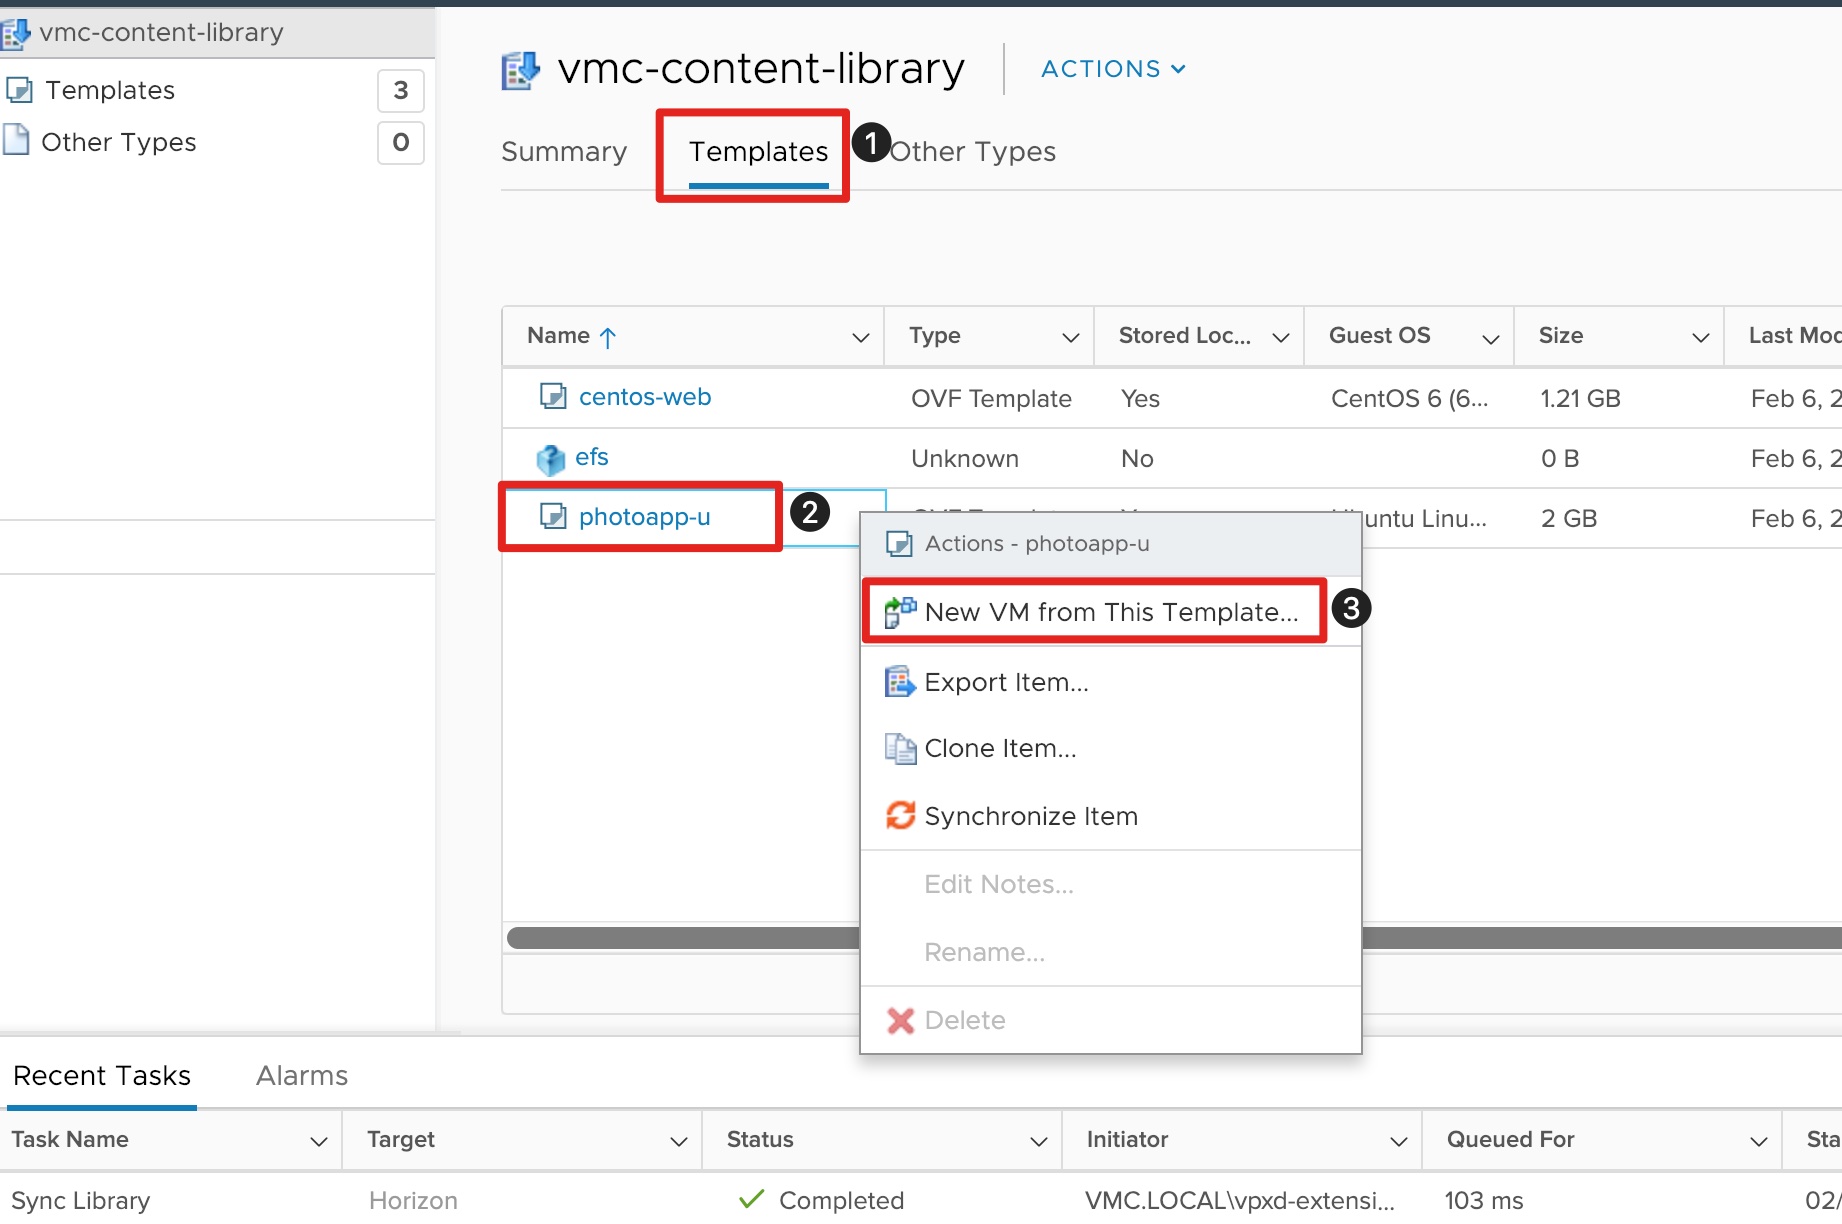
- Click the Templates tab to access the template synchronized in the content library.
- Right-click on the photoapp-u template to expose the Actions menu.
- Click on New VM from This Template to deploy a virtual machine from template.
Choose Virtual Machine Name and Location
{% capture notice–custspec1 %} Note: Please skip adding the customization specification by not checking the box next to Customize the operating system {% endcapture %}
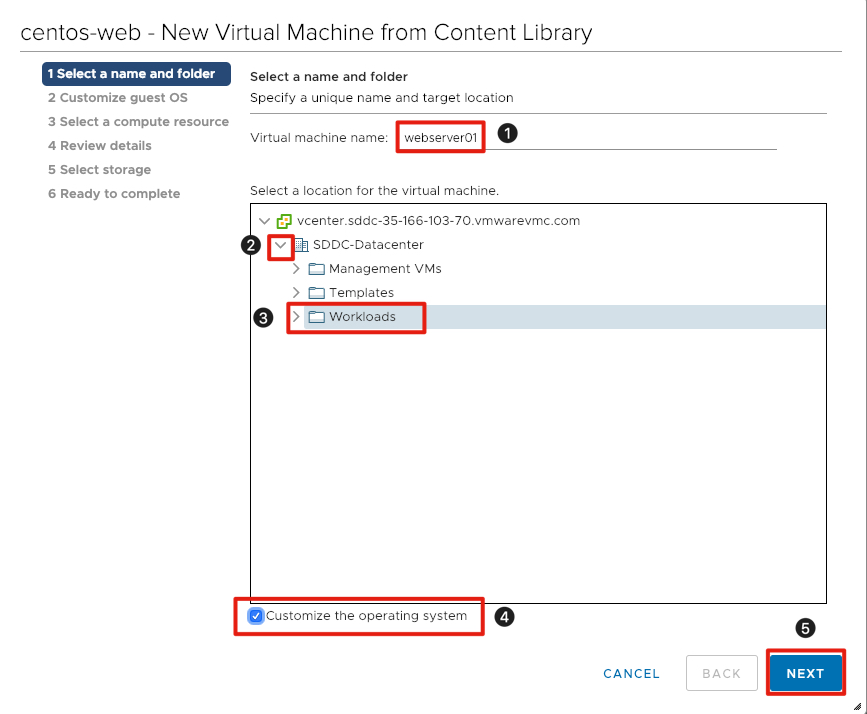
- Enter webserver01 for the virtual machine name.
- Click the arrow next to SDDC-Datacenter to expose the folders available.
- In VMware Cloud on AWS customer workloadds should be placed in the Workloads folder (or subfolder). Click the Workloads folder.
- Select the checkbox next to Customize the operating system.
- Click Next to continue.
Choose Virtual Machine Customization Specification
We will utilize the customization specification created in a previous module to customize the operating system.
- Click to select the LinuxSpec customization specification.
- Click next to continue.
Select Resource Pool
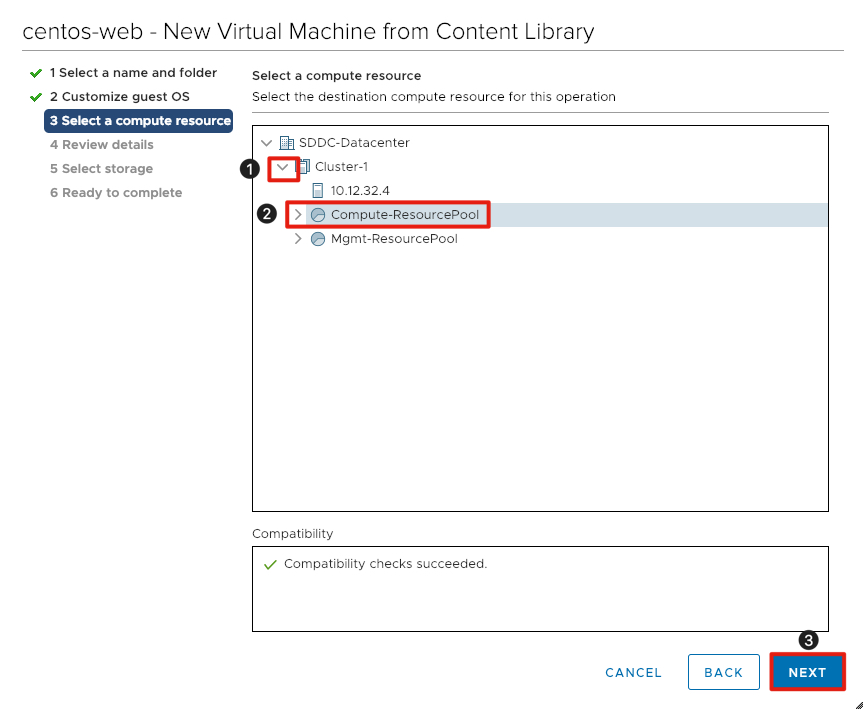
- Click the arrow next to Cluster-1 to expose the resource pools available.
- In VMware Cloud on AWS customer workloads should be placed in the Compute-ResourcePool (or subpool). Click Compute-ResourcePool.
- Click Next to continue.
Review the Template Details
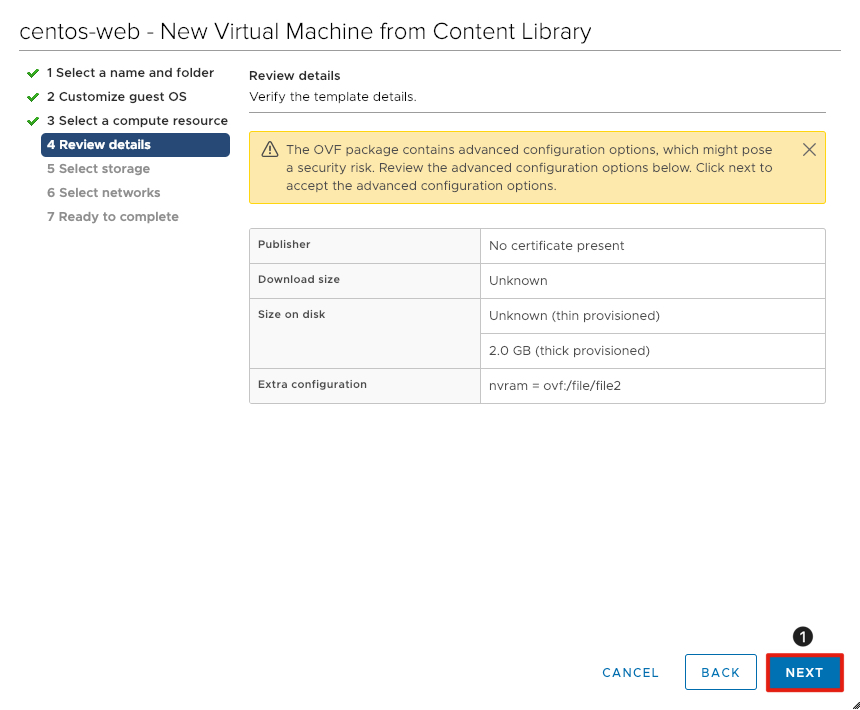
Review the details of the template to be deployed. There may be a security warning displayed, but you can safely ignore that for the purpose of this lab.
- Click Next to continue.
Select Storage
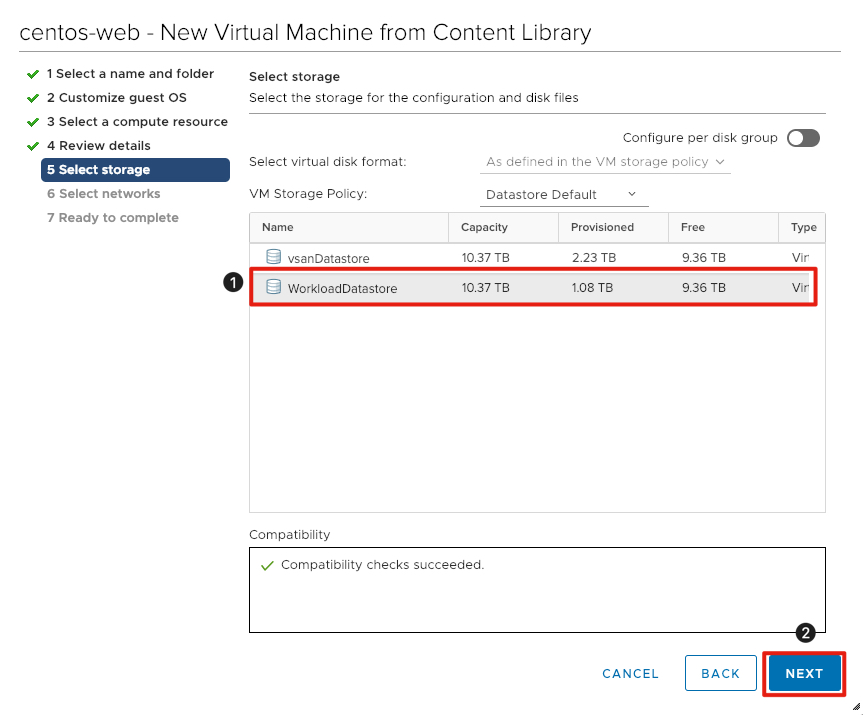
Each VMware Cloud on AWS SDDC will include two datastores in order to separate management and customer workloads. All customer workloads should be placed in the datastore named WorkloadDatastore.
- Click WorkloadDatastore to select the datastore where the virtual machine will be provisioned.
- Click Next to continue.
Select the Network for the Virtual Machine
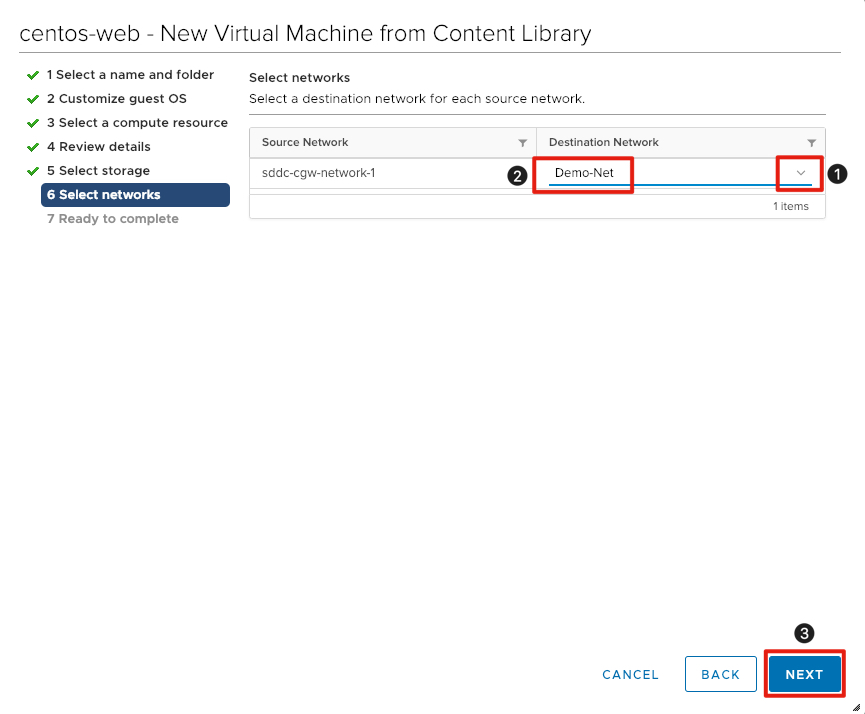
We will use the logical network created in a previous exercise for these virtual machines.
- Click the arrow below Destination Network to select the network for the virtual machine.
- Click Demo-Net to select the network previously created.
- Click Next to continue.
Complete the Virtual Machine Deployment
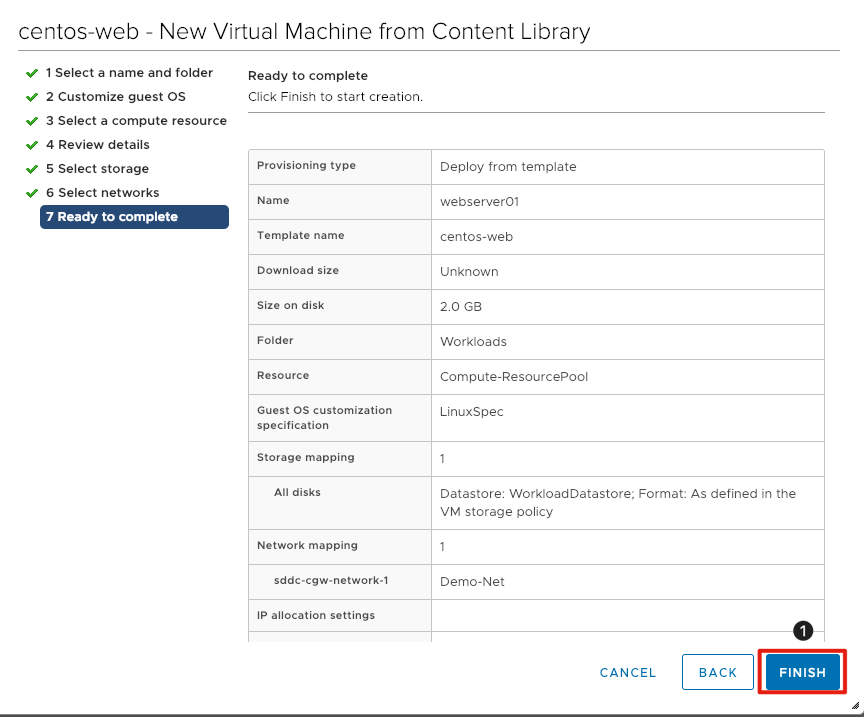
- Review the information for accuracy and click Finish to deploy the virtual machine
It should take a couple of minutes for the virtual machine to deploy. Continue to the next exercise to clone this virtual machine in order to create a second webserver.
Clone a Virtual Machine
In this exercise, you will clone the virtual machine created in the previous exercise in order to create a second webserver.
Navigate to VMs and Templates
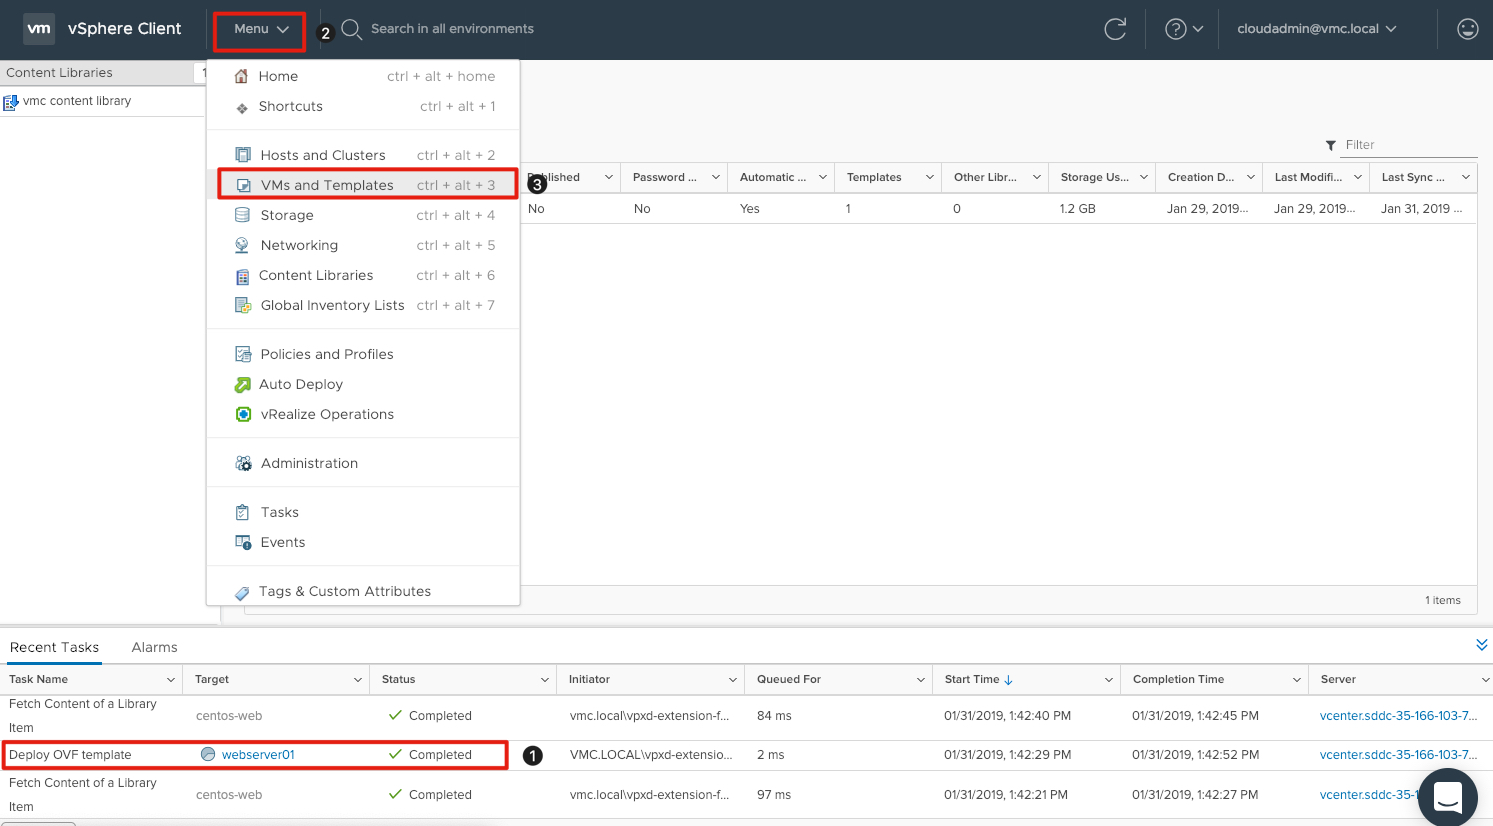
- Validate the virtual machine deployment completed in the previous exercise by looking for the Deploy OVF Template task and verifying it is Complete.
- If complete, click on Menu.
- Click VMs and Templates to navigate to the VMs and Templates view.
Select and Power On Webserver01
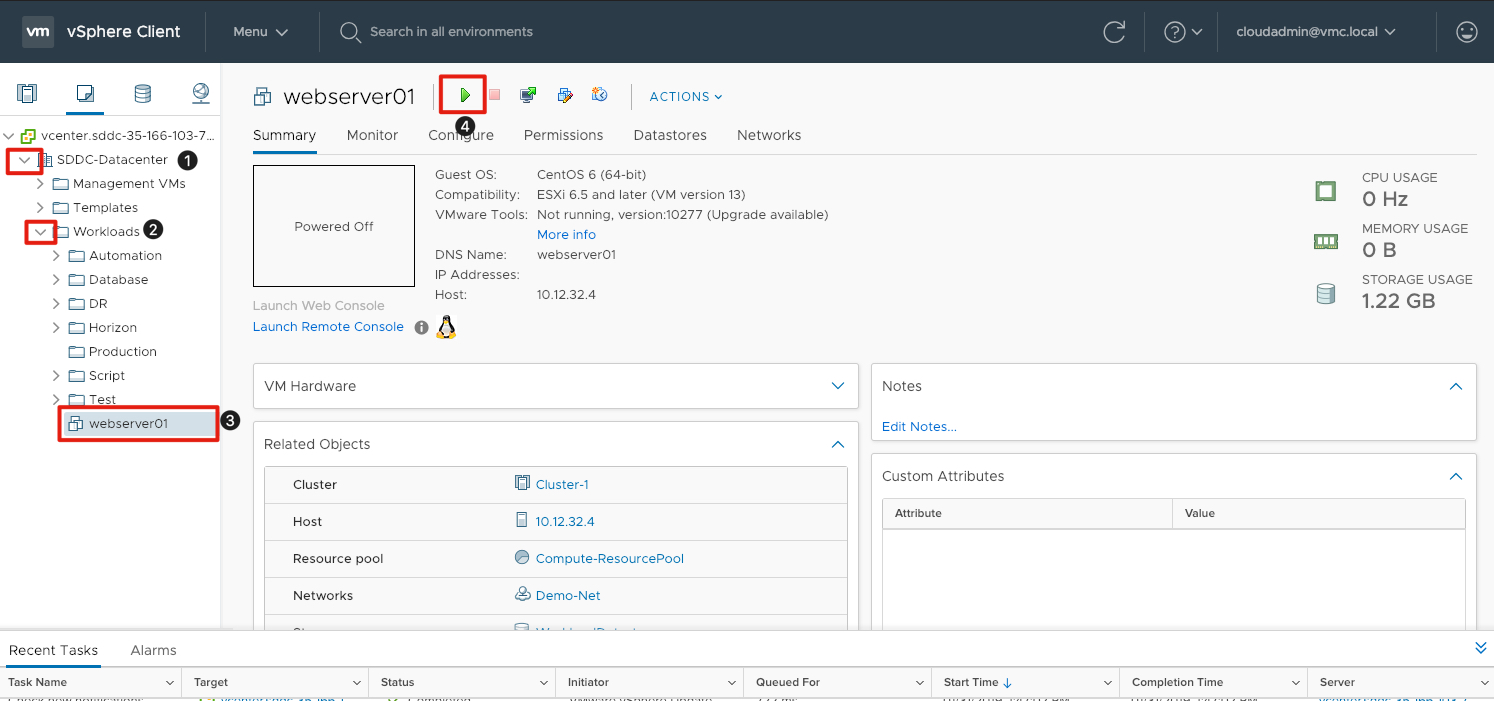
Before we can clone the web server, we will first need to power the VM on so the customization specification can execute:
- Click the arrow next to SDDC-Datacenter to expose the sub-folders.
- Click the arrow next to workloads to expose webserver01
- Click on the virtual machine webserver01
- Click the green arrow in the top center of the screen to execte the power on operation.
Note: Please wait until the virtual machine is fully powered on before proceeding to the next step.
{% capture notice-3 %} If the webserver doesn’t connect to the network and does not receive an IP address from DHCP. Ensure the NIC is connected by right-clicking on webserver01 and then Edit Settings and make sure the checkbox next to Connected is selected. You may need to repeat this step for the cloned VM webserver02 {% endcapture %}
Initiate Cloning of the Virtual Machine
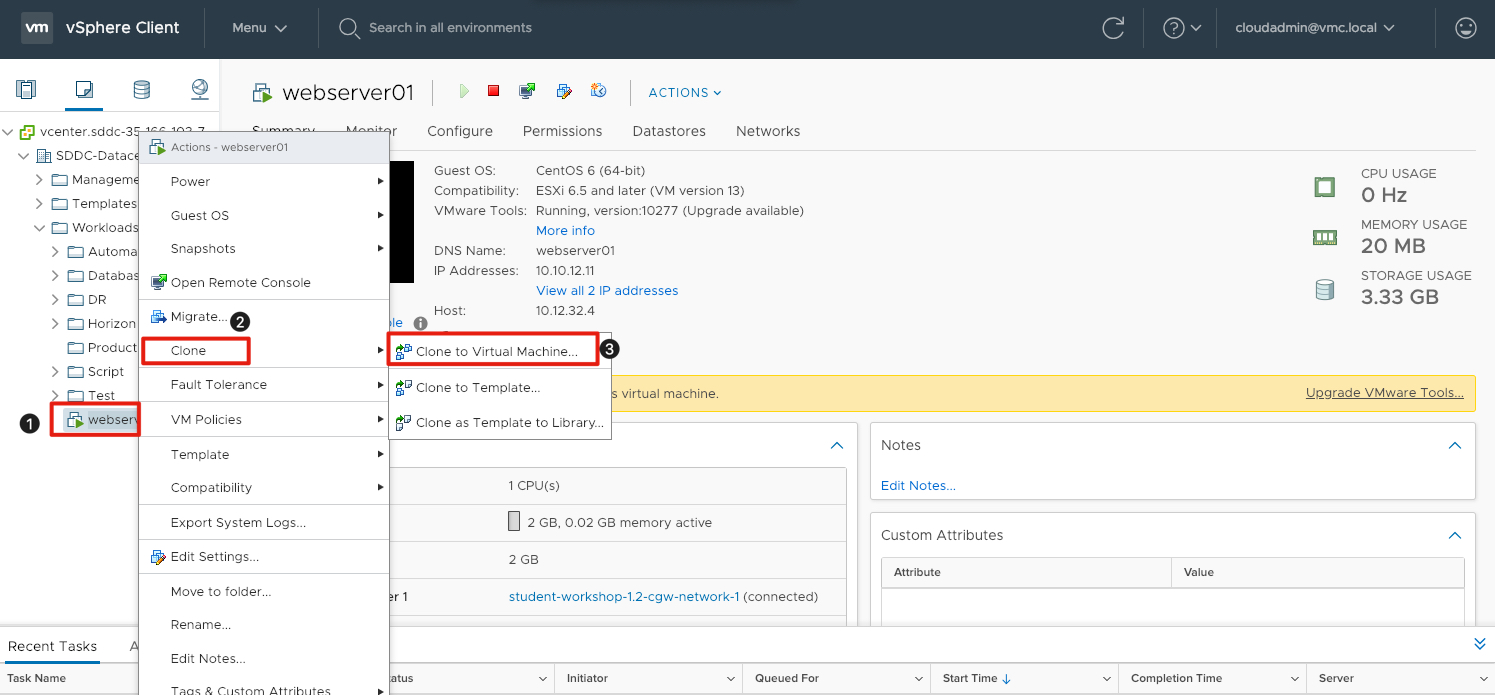
We will now begin the process of cloning this virtual machine.
- Right-click on webserver01 to expose the Actions menu.
- Click on Clone to expose a secondary menu of options.
- Click Clone to Virtual Machine to initiate the cloning wizard.
Select Virtual Machine Name and Folder
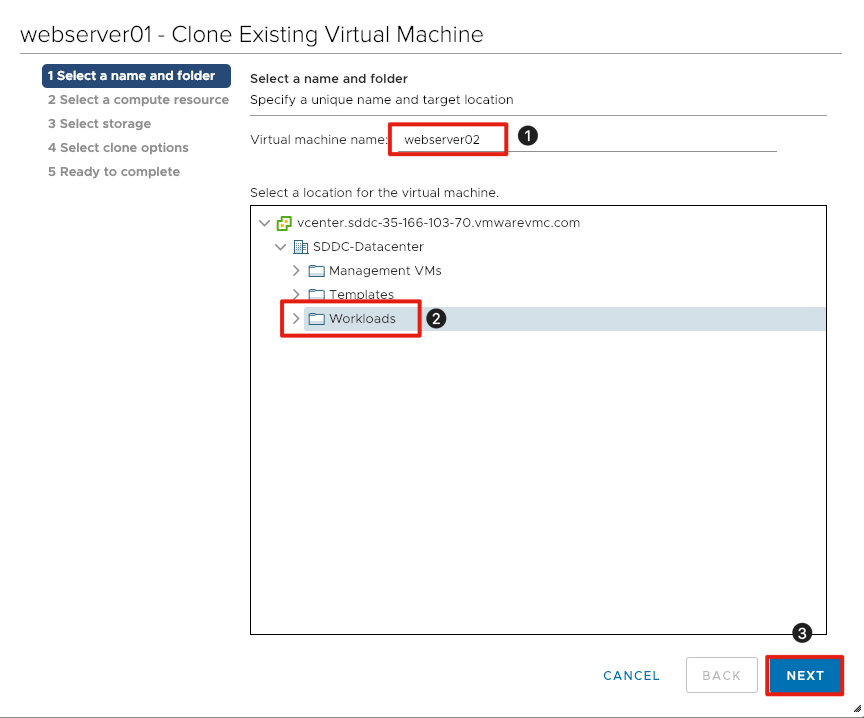
- Next to Virtual machine name enter webserver02.
- Click the Workloads folder for the virtual machine location.
- Click Next to continue.
Select Virtual Machine Compute Resource
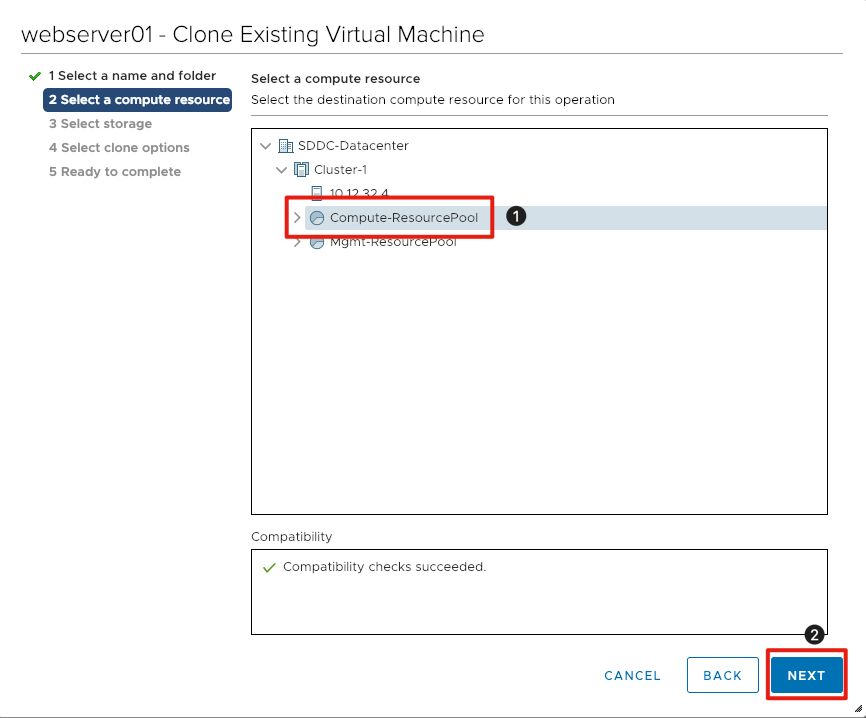
- Click on Compute-ResourcePool to ensure it is selected for the target virtual machine.
- Click Next to continue.
Select Virtual Machine Datastore

- Click on WorkloadDatastore to ensure it is selected as the destination for the virtual machine.
- Click Next to continue.
{% capture notice–custspec %} Note: Please skip adding the customization specification by not checking the box next to Customize the operating system {% endcapture %}
Select Cloning Options
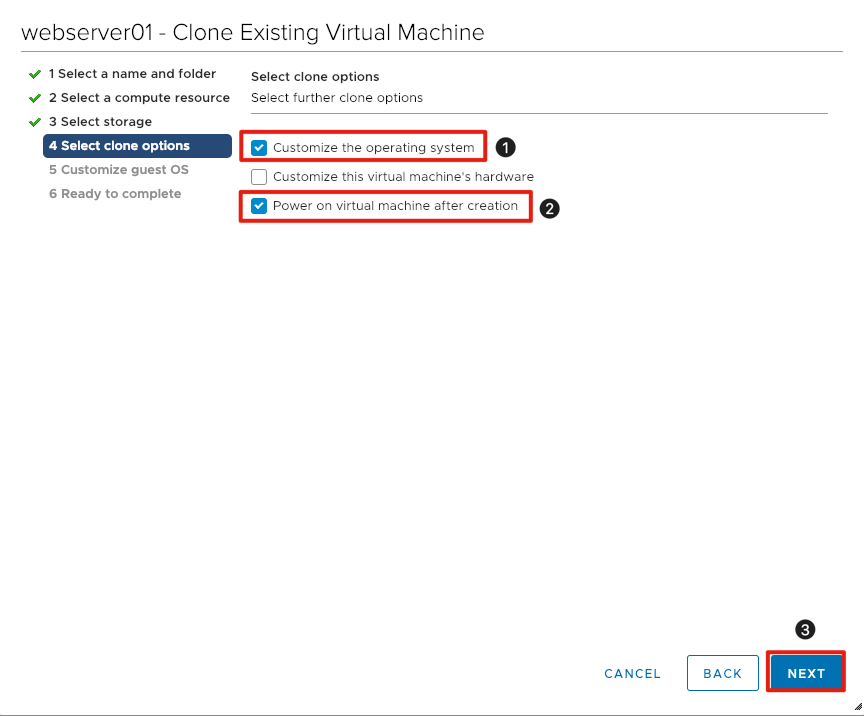
We will now set the options for cloning. We will need to customize the operating system to change the server name and als power on the virtual machine after cloning is complete.
- Click the checkbox next to Customize the operating system.
- Click the checkbox next to Power on virtual machine after creation.
- Click Next to continue.
Choose the Virtual Machine Customization Specification
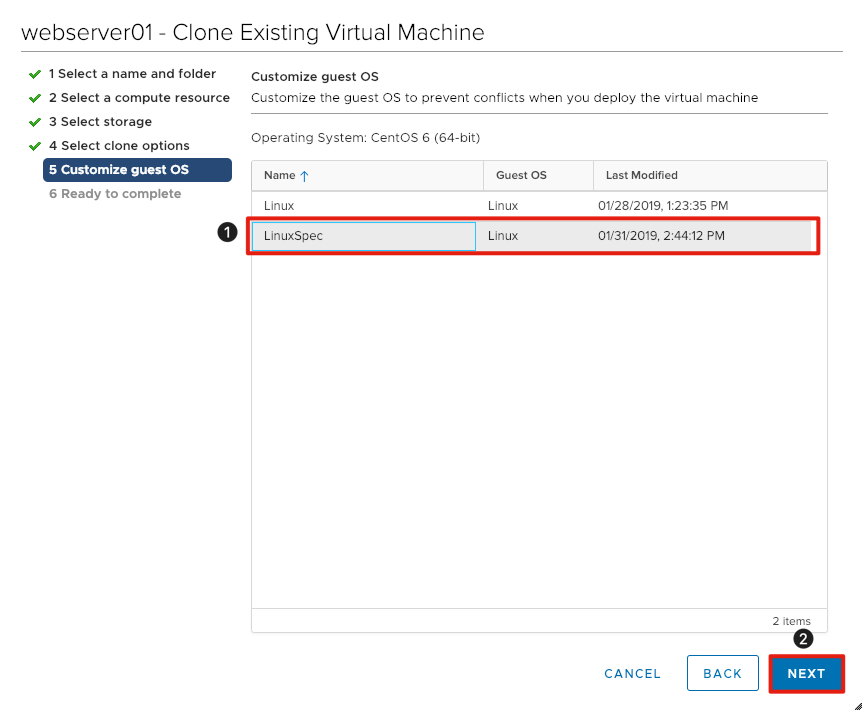
We will utilize the customization specification created in a previous exercise to customize the operating system.
- Click to select the LinuxSpec customization specification.
- Click Next to continue.
Complete a Virtual Machine Deployment
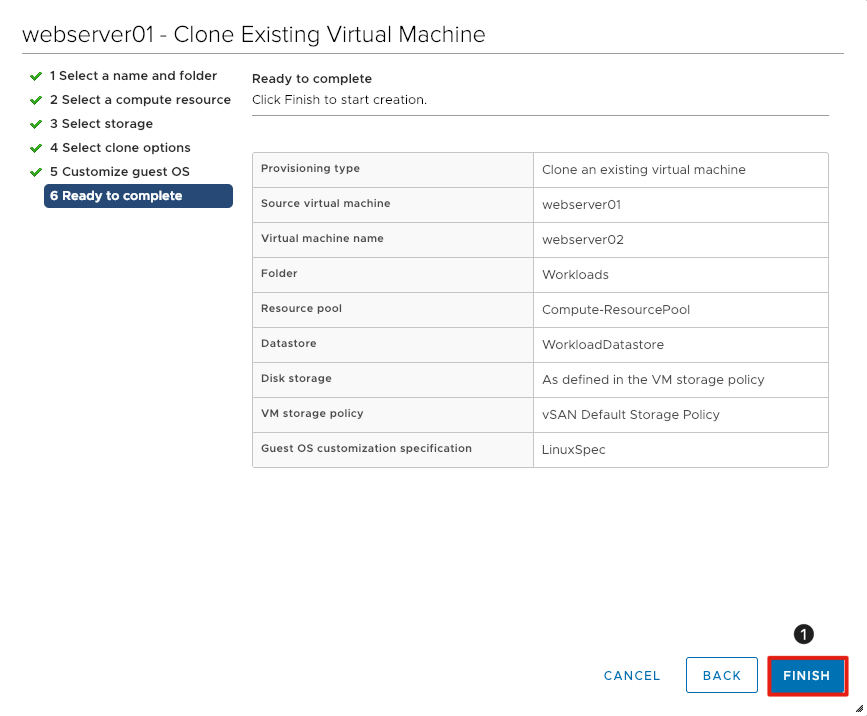
- Review the information for accuracy and click Finish to clone the virtual machine.
It should take a couple of minutes fort the virtual machine to clone. Continue to the next exercise to learn about securing workloads in VMware Cloud on AWS.
{% capture notice-4 %} If the webserver doesn’t connect to the network and does not receive an IP address from DHCP. Ensure the NIC is connected by right-clicking on webserver01 and then Edit Settings and make sure the checkbox next to Connected is selected. You may need to repeat this step for the cloned VM webserver02 {% endcapture %}
Testing connectivity between the Virtual Machines
In this exercise we will test the connectivity between webserver01 and webserver02, which we created in the previous exercises.
Open Console to Webserver01
We need to open a console session to webserver01 to validate it can communicate with webserver02.
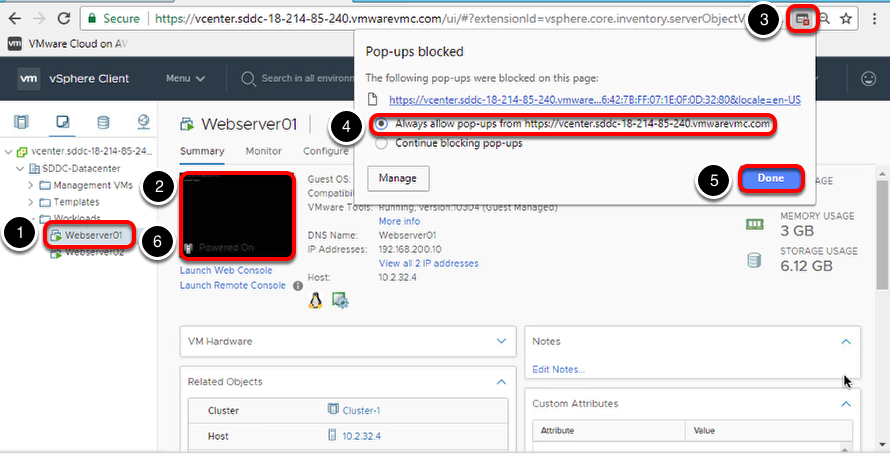
- In the vSphere Client (HTML5) click on Webserver01 to bring it into focus.
- Click the black box below Summary in the middle of the screen. This will attempt to launch a console session but it may fail because the pop-up was blocked. If this occurs follow steps 3-6, otherwise proceed to the next section.
- Click the icon with the small red x in the Chrome address bar to launch to pop-up blocker dialog.
- Click the radio button next to Always allow pop-ups from https://vcenter.sddc-xx-xx-xxxx.vmwarevmc.com
- Click the Done button.
- Return to the black box below the Summary and click it again. The console session should launch in a new tab.
Find the IP Address for Webserver02
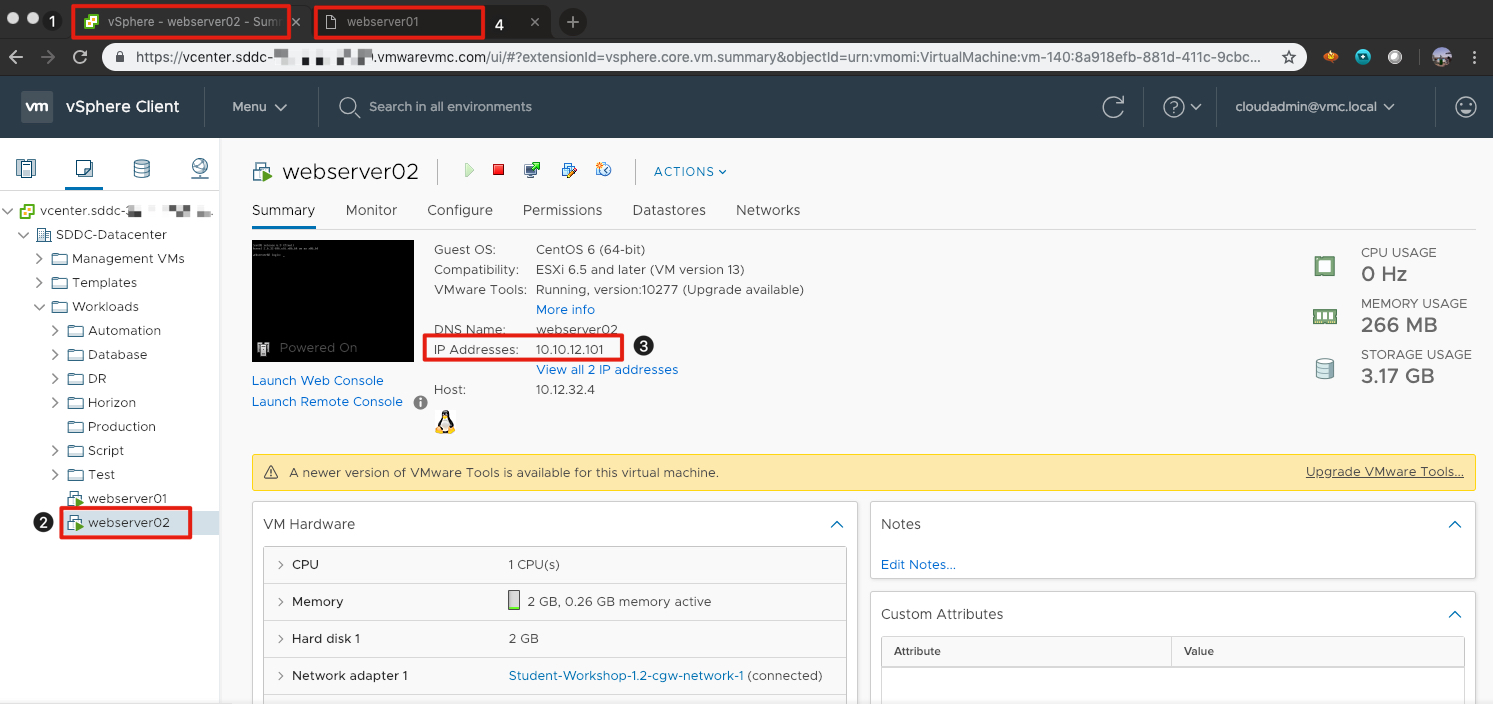
Before we can test connectivity between the two servers, we need to find the IP address of webserver02.
- Click the Chrome Tab of the vSphere Client (HTML5) to bring it back into focus.
- Click on the virtual machine webserver02.
- Take note of the IP Address for webserver02 in the middle of the screen. This will be needed in the next step.
- Click the Chrome Tab of the console session for webserver01 to bring it back into focus.
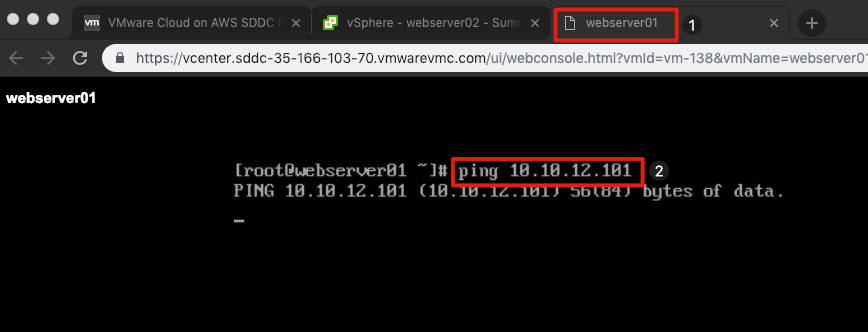
Login and Ping Webserver02
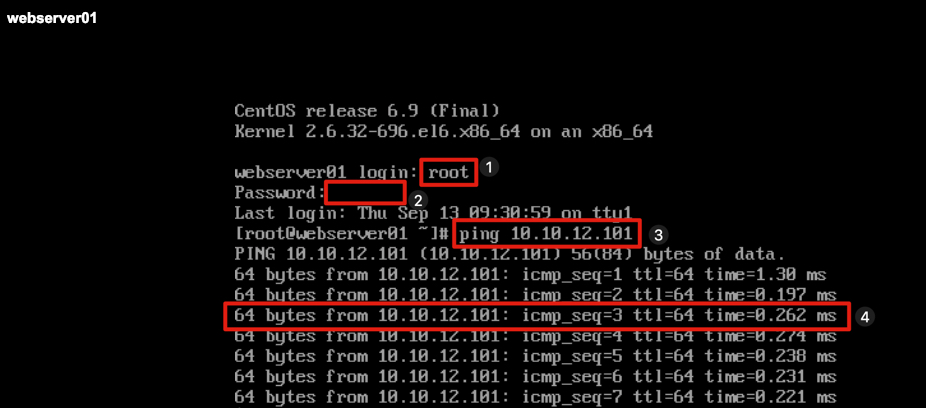
Now that we have to IP address for Webserver02 let’s setup a continuous ping to the server to verify communication.
Before beginning click anywhere inside the console window to bring it into focus
- At the login prompt enter root and press Enter.
- At the password prompt enter VMware1! and press Enter.
- At the console prompt, enter ping 10.10.xx.xxx and press Enter. The third octet is based on student number and the last octet of the IP address in most cases it will be 101, but verify this in your configuration.
- Verify the pings are successful.
NOTE: Please leave this ping and console Window open for the next lesson. We will revisit it to verify the web servers can no longer communicate.
Congratulations! You have now deployed two web servers in VMware Cloud on AWS SDDC and verified they can communicate with each other. In the next lesson we will create firewall rules to block the servers from communicating with each other and also make webserver02 accessible from the internet.
Configuring VMware Cloud on AWS Advanced Network Services
VMware Cloud on AWS Advanced Network Services is now available for new SDDC deployments.
Distributed Firewall in VMware Cloud on AWS Advanced Network Services
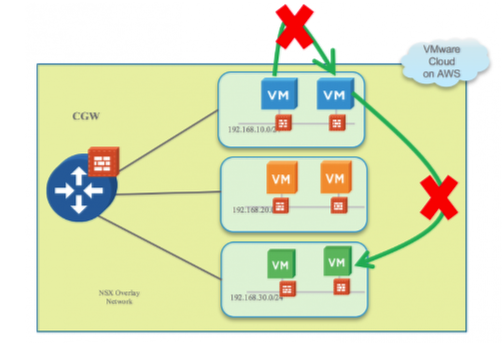
Using VMware Cloud on AWS Advanced Network Services, users have the capability to implement micro-segmentation with Distributed Firewall. Granular security policies can be applied at the VM-level allowing for segmentation within the same L2 network or across separate L3 networks. This is shown in the diagram above.
All networking and security configuration is now done through the VMware Cloud on AWS console via the Networking & Security tab, including creating network segments. This provides ease of operations and management by having all networking and security access through the console.
Distributed Firewall

From the above screenshot, you can see, in addition to the ability to create multiple sections, users can organize Distributed Firewall rules into groups (Emergency Rules, Infrastructure Rules, Environment Rules, and Application Rules. The rules are hit from the top-down.
Security Groups
In addition to the new Distributed Firewall capabilities, grouping objects can now be leveraged within security policies. Security groups support the following grouping criteria/constructs:
- IP Address
- VM Instance
- Matching criteria of VM Name
- Matching Criteria of Security Tag
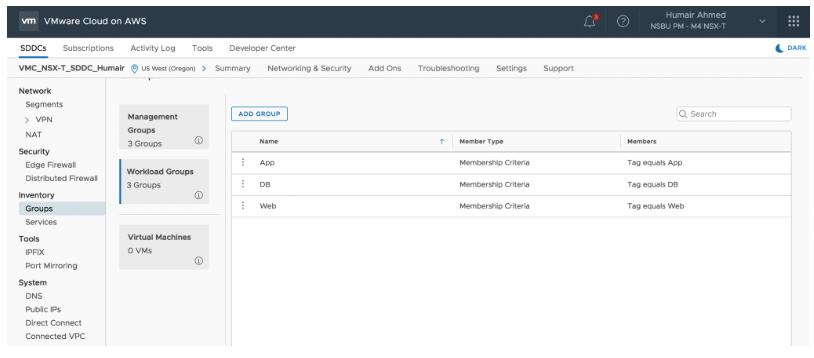
As shown above, Security Groups can be created under Workload Groups or Management Groups. Workload Groups can be used in DFW and CGW firewall policies and Management Groups can be used under MGW firewall policies. Management Groups only support IP addresses as these groups are infrastructure based. Predefined Management Groups groups already exist for vCenter, ESXi hosts, and NSX Manager. Users can also create groups here based on IP address for on-prem ESXi hosts, vCenter, and other management appliances.
View VM’s in a Security Group
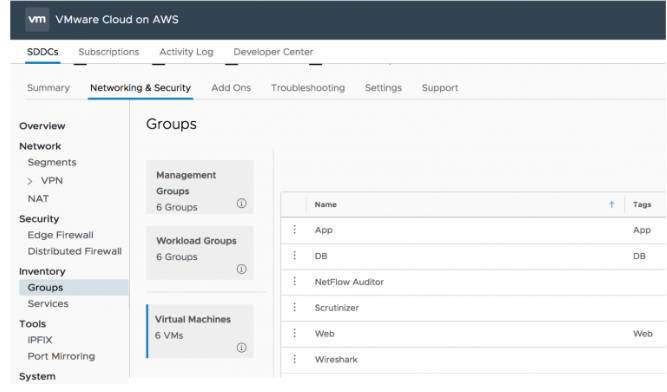
Here you can see we have deployed some VMs in vCenter and you can see the VMs in inventory within the console. Additionally, we have tagged the VMs with Web, App, and DB Security Tags respectively.
Tagging Virtual Machines

Through the VMware Cloud on AWS console we can apply security tags to virtual machines and then group them.
We will now switch back to the VMware Cloud on AWS console.
- Click on the VMware Cloud on AWS Chrome tab and login with the information you were provided if your session has expired.
- Click on View Details to access the details for the SDDC.
Edit Tags for Webserver01
We will now begin tagging the virtual machines with security tags.
- Click on the Networking & Security tab to access the networking configuration.
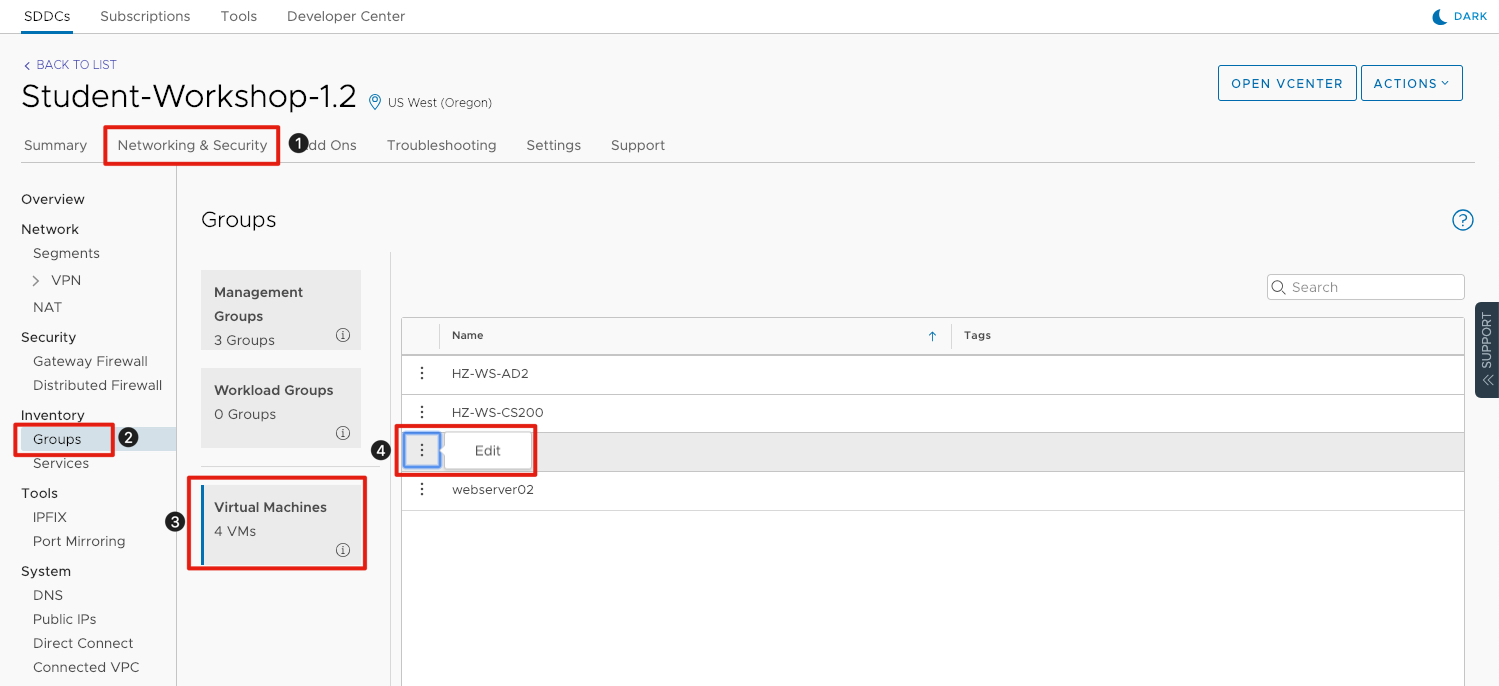
- On the left-hand side of the screen click on Groups.
- Under Groups, click on Virtual Machines to access the virtual machines that are part of the SDDC.
- Locate webserver01 and click the three vertical dots and click Edit.
Add Security Tag for Web
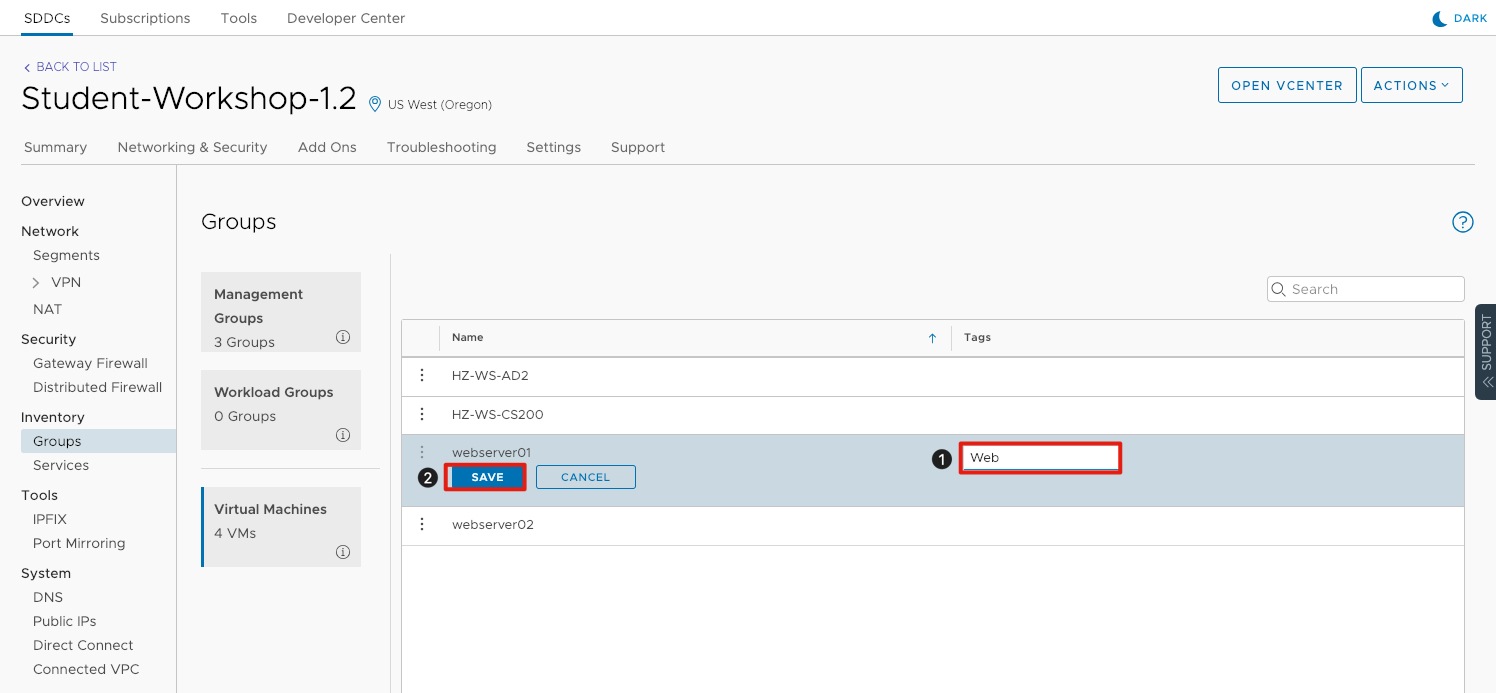
- Under Tags, enter Web for webserver01.
- Click Save to commit the changes.
Edit Tags for Webserver02
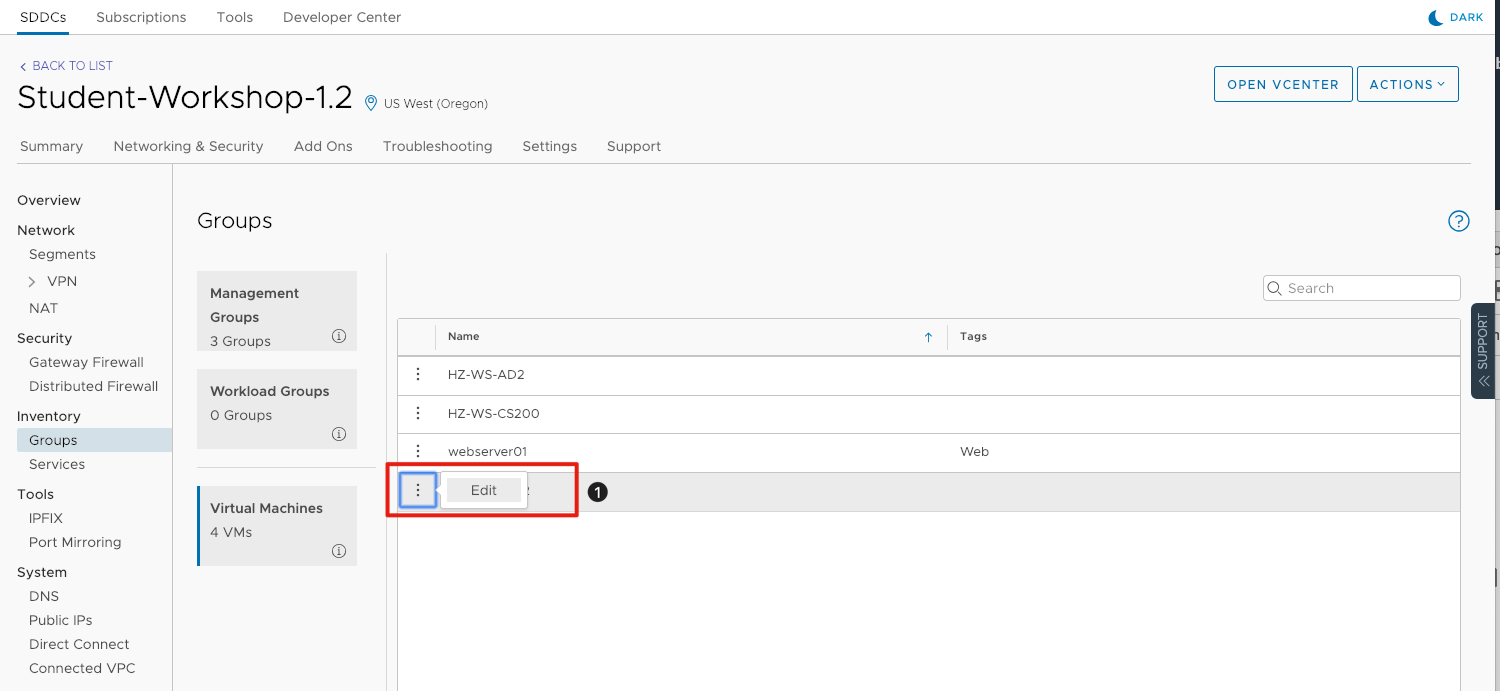
We will now tag Webserver02 with the same Web tag. We will use this to create a group for both web servers.
- Locate webserver02 and click the three vertical dots and click Edit.
Add Security Tag for Webserver02
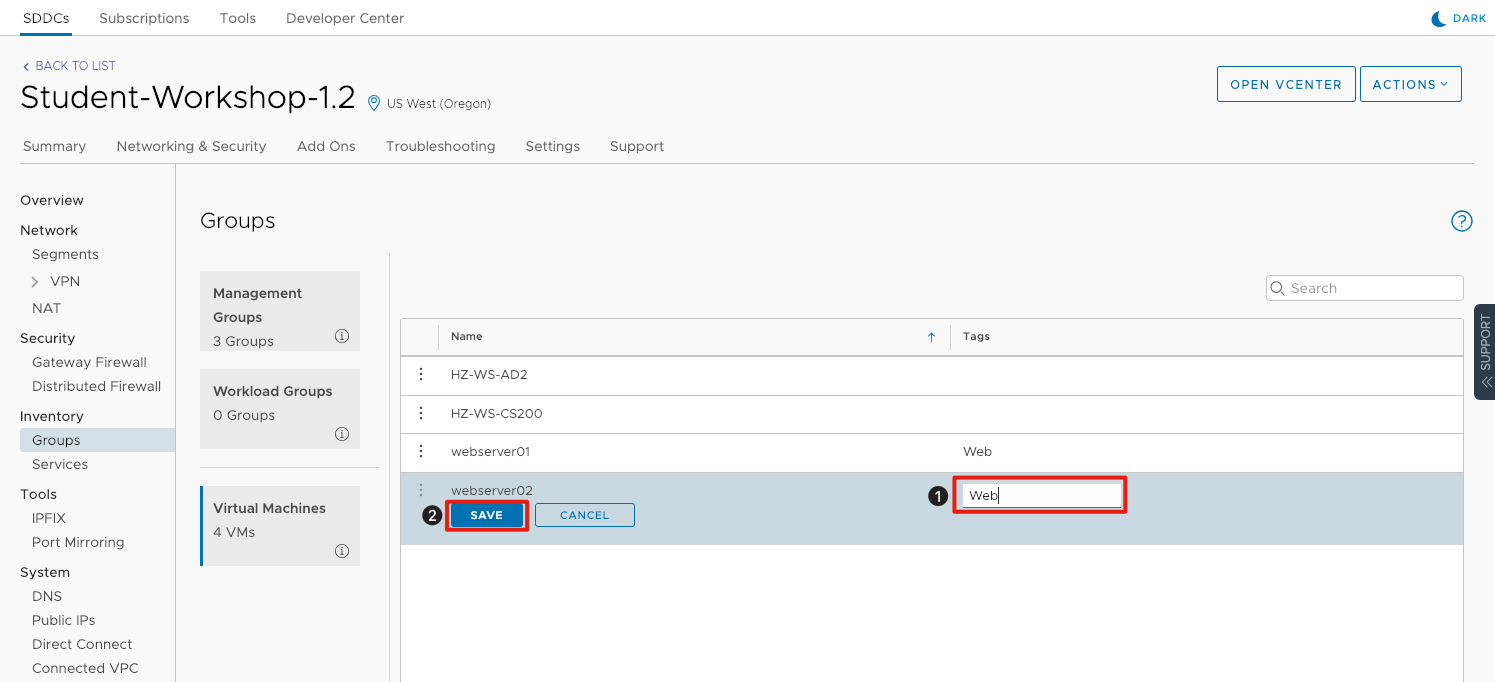
- Under Tags, Enter Web for webserver02.
- Click Save to commit the changes.
Creating a Dynamic Group
Groups can be used in VMware Cloud on AWS Advanced Network Services to group virtual machines and simplify rulebase configuration. In this exercise we will group the two webservers into a group and then create a firewall rule to block communication between them. In a properly architected traditional application there is usually no need for servers in the web tier to communicate.
We will now create a group of web servers based on the dynamic security tag we applied earlier.
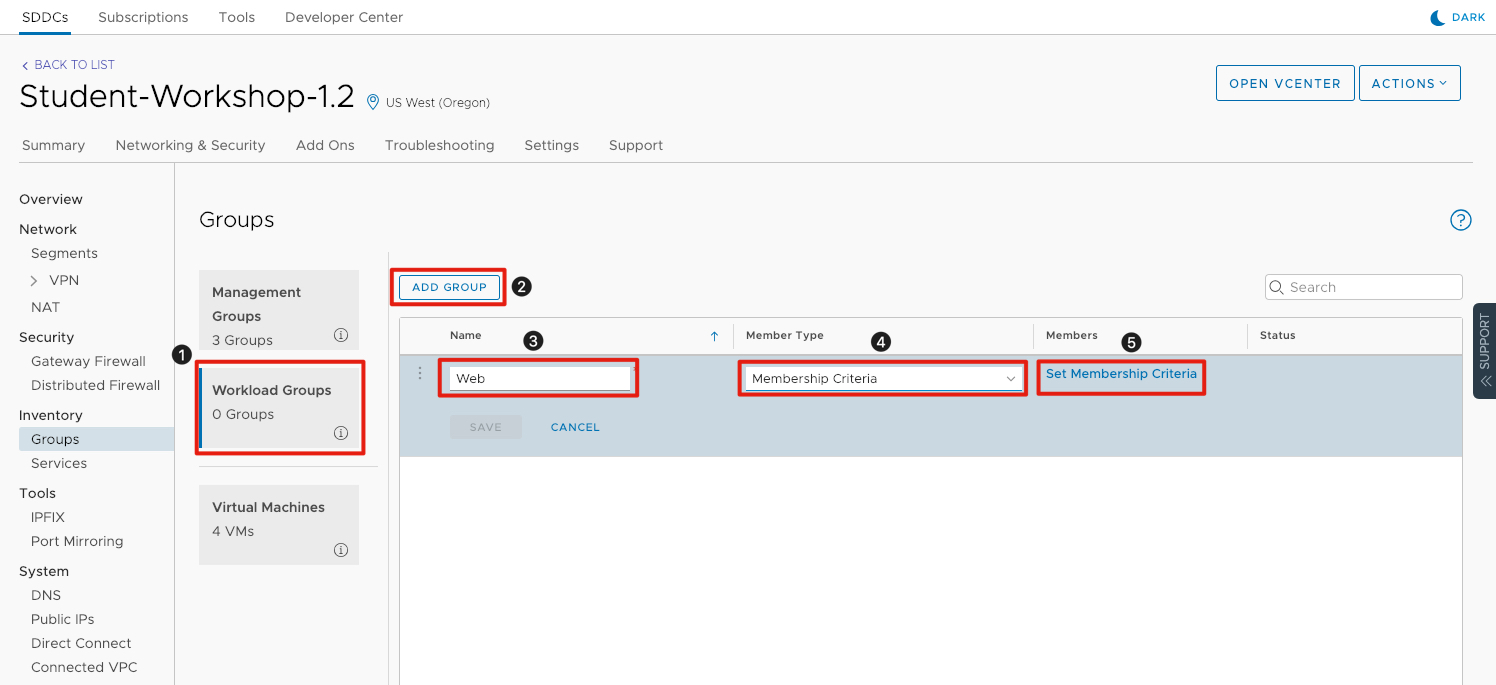
- Click on Workload Groups.
- Click on Add Group.
- Under Name enter Web for the name of the group.
- Under Member Type, click the drop down and select Membership Criteria.
- Under Members click Set Membership Criteria.
Add Membership Criteria
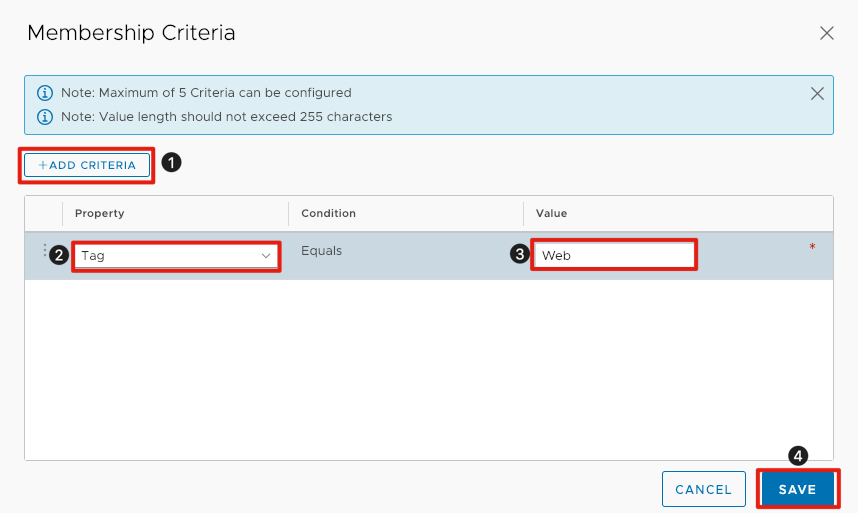
We will now add the criteria to group machines based on security tag.
- Click on + Add Criteria.
- Under Property, click the drop-down and select Tag.
- Under Value, enter Web.
- Click Save to continue.
Save Workload Group Changes
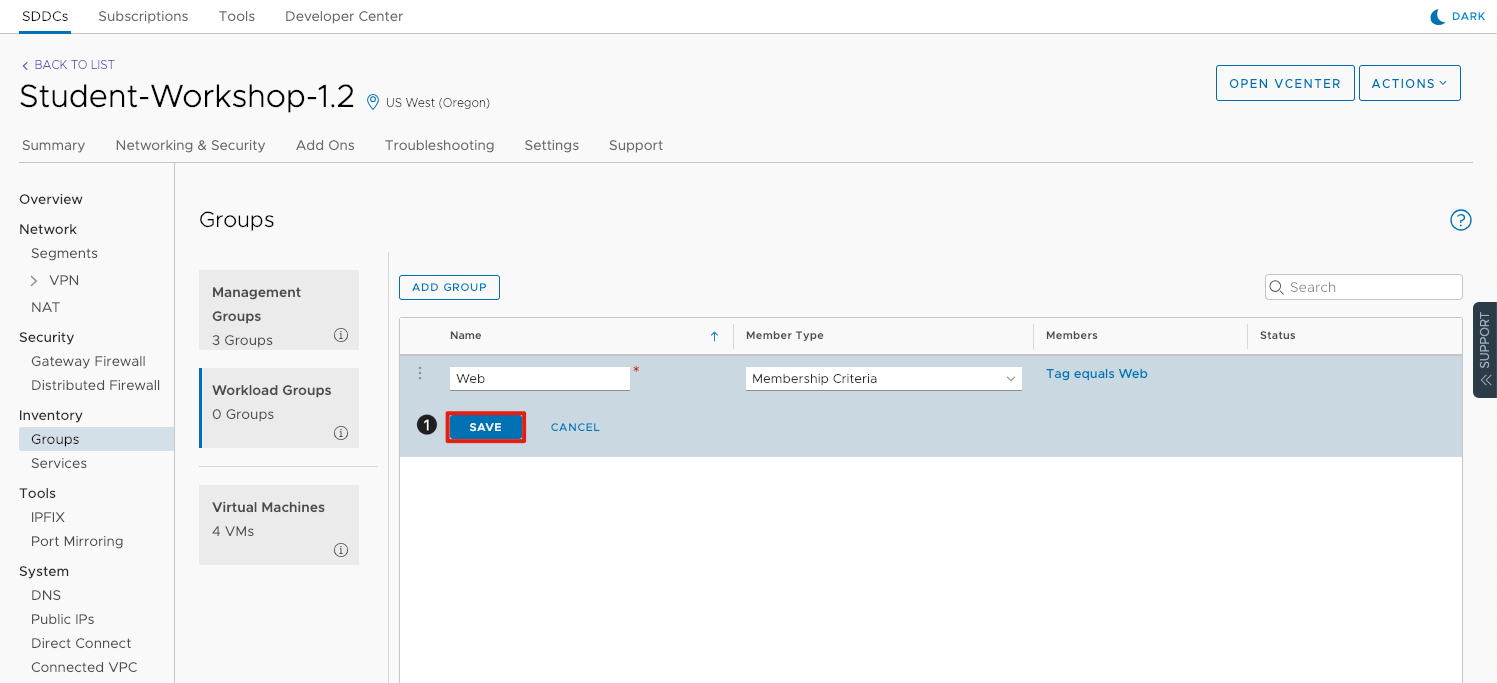
- Click Save to commit the changes.
View Members
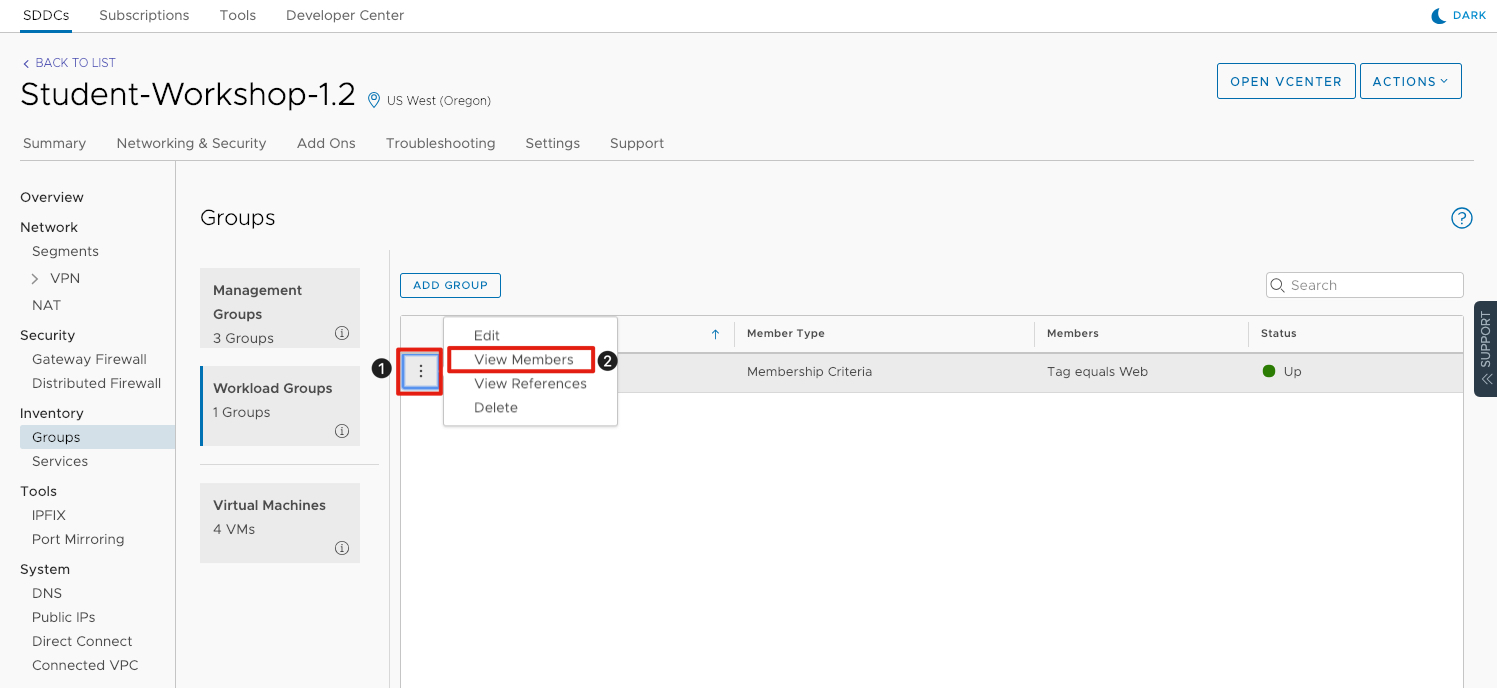
We can now validate the group membership is working as expected.
- Click the three vertical dots next to the Web group.
- Click on View Members to show the current members of the dynamic group.
Validate Group Members
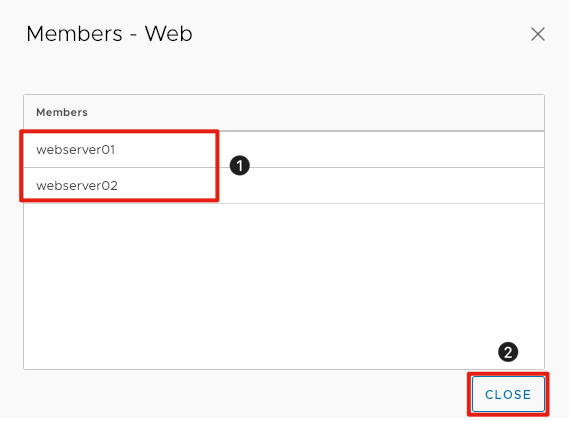
- Validate that both webserver01 and webserver02 appear in the group membership. If they do not, go back and verify there are no typos.
- Click Close.
Now that this group is created, you can easily add new members by simply applying a security tag.
Create a Firewall Rule Section
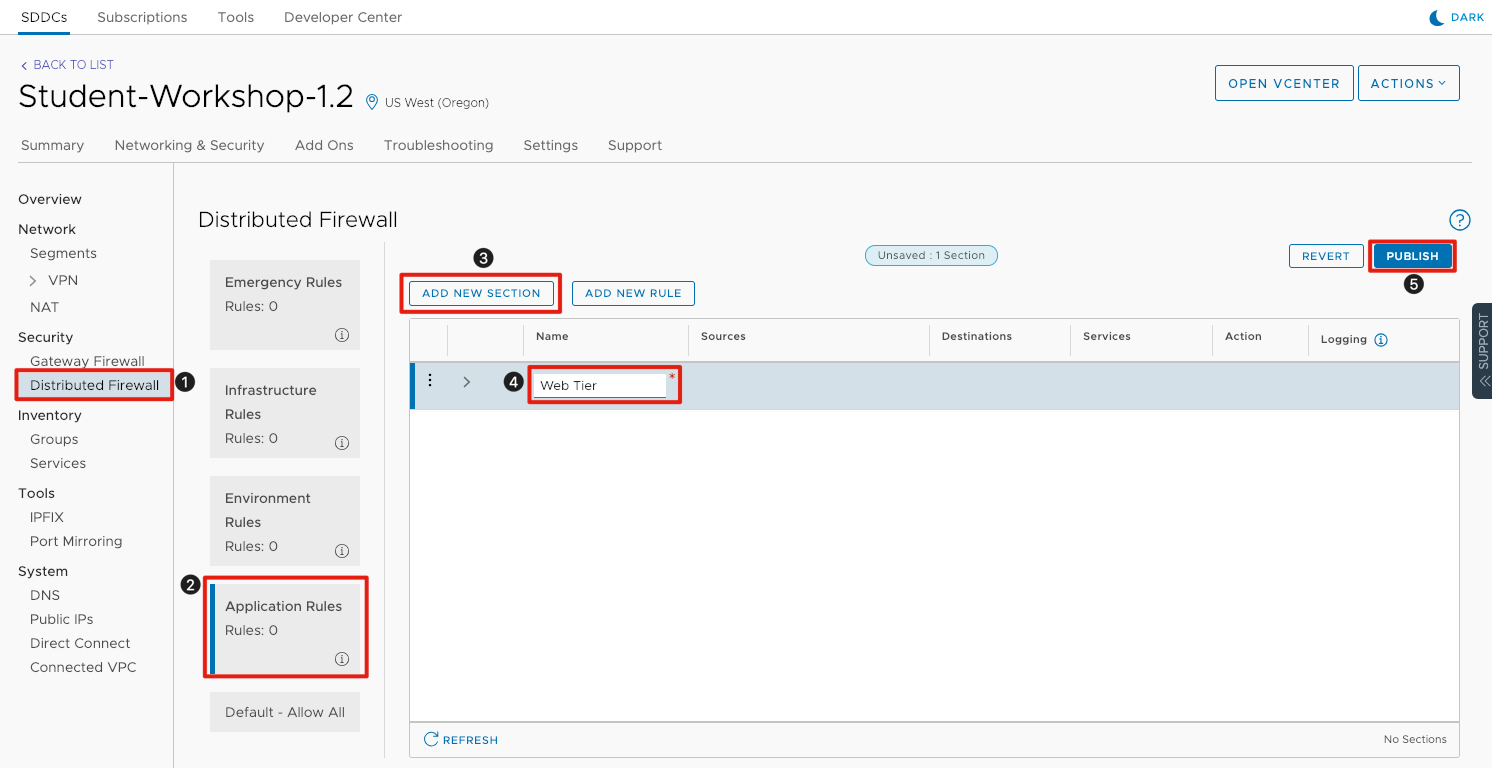
Now that we have created our dynamic group, let’s create a firewall rule to block access between the web servers.
- Click Distributed Firewall on the left-hand side of the screen.
- Click Application Rules.
- Click Add New Section to create a new section for the rule. This functionality allows you to group rules logically to make operating the environment simpler.
- Under Name, enter Web Tier.
- Click Publish to commit the changes.
Add Firewall Rule
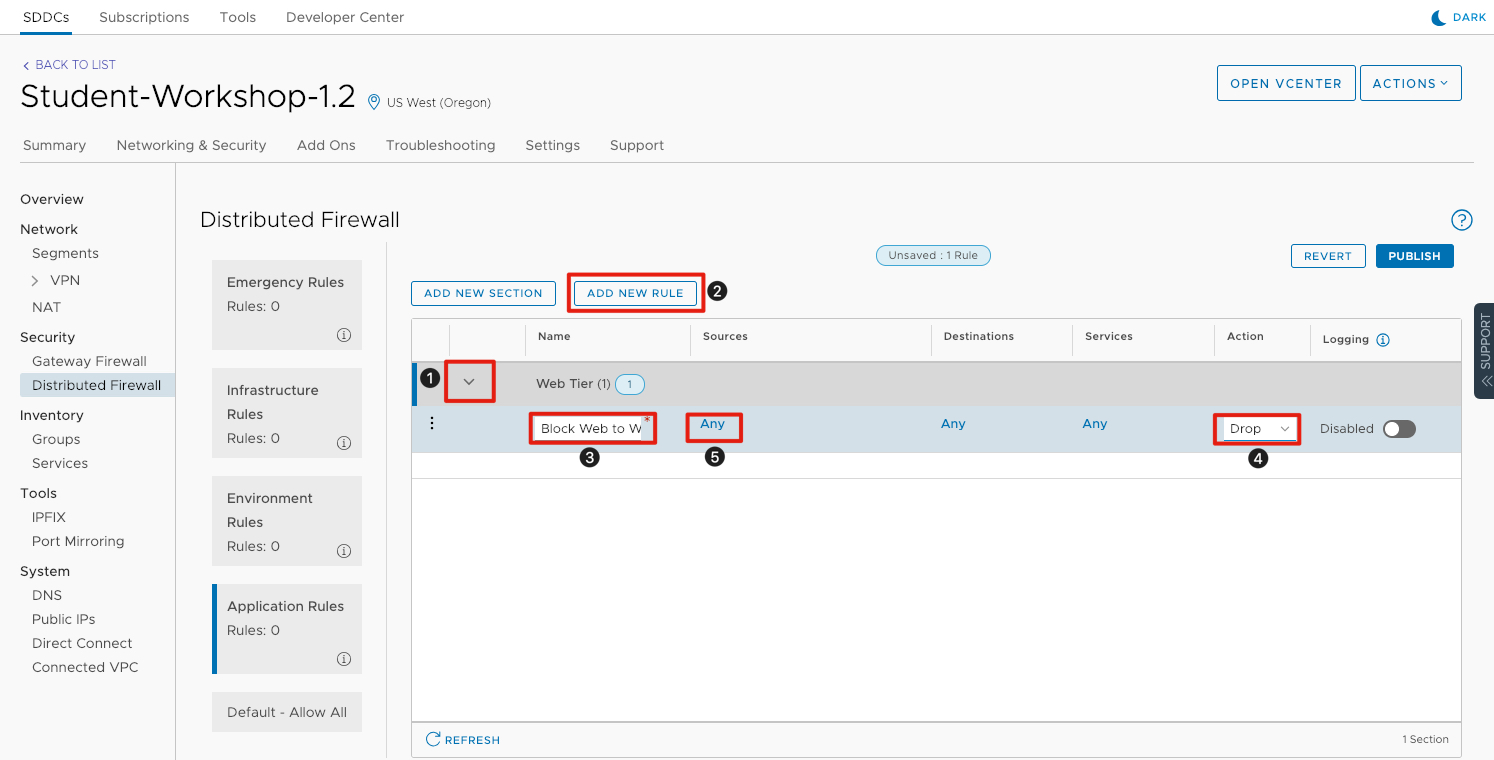
Now that we have the section created, we can now add a firewall rule.
- Click the arrow next to the Web Tier section.
- Click Add New Rule in the menu above the rules.
- Under Name, enter Block Web To Web.
- Under Action, click the drop-down and select Drop.
- Under Sources click Any.
Select Source
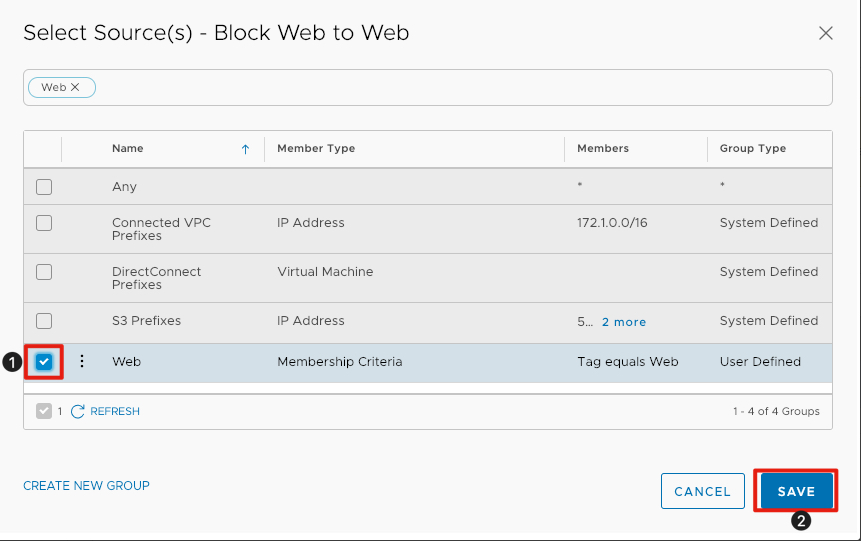
- Click the checkbox next to Web.
- click Save to commit the changes to the rule.
Add Destination
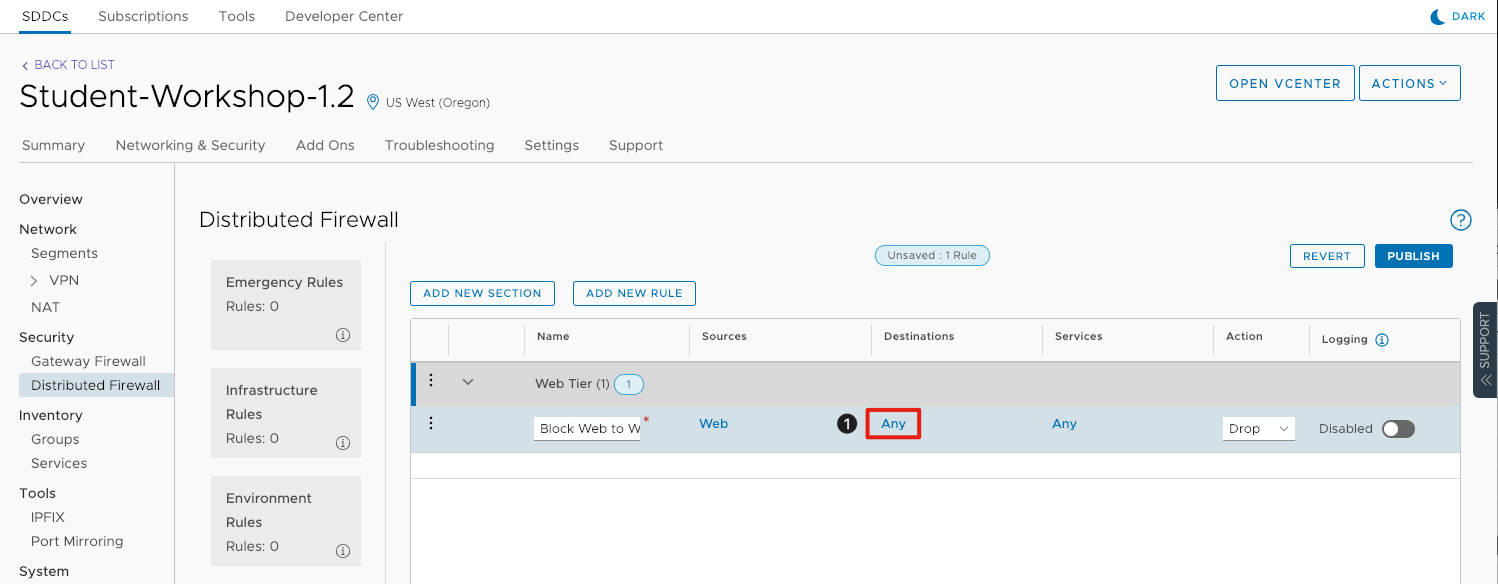
- Under Destinations click Any.
Select Destination
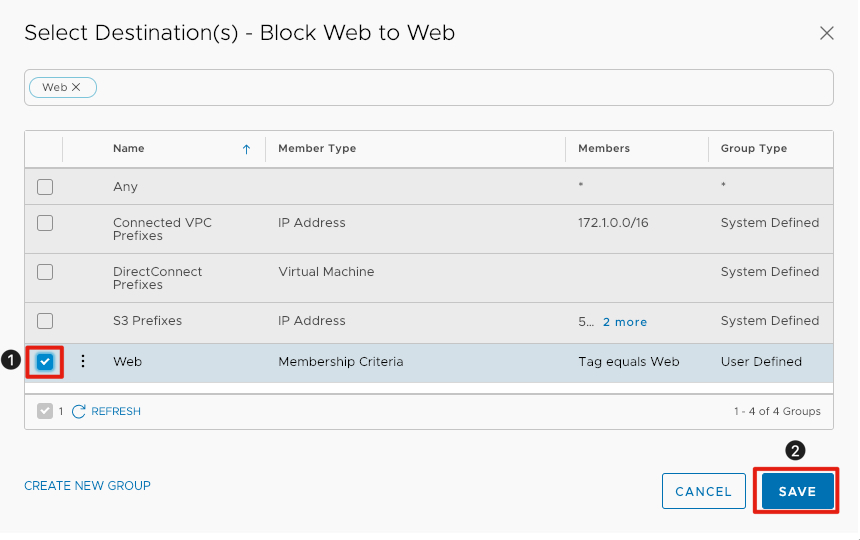
- Click the checkbox next to Web.
- click Save to commit the changes to the rule.
Publish Firewall Rule
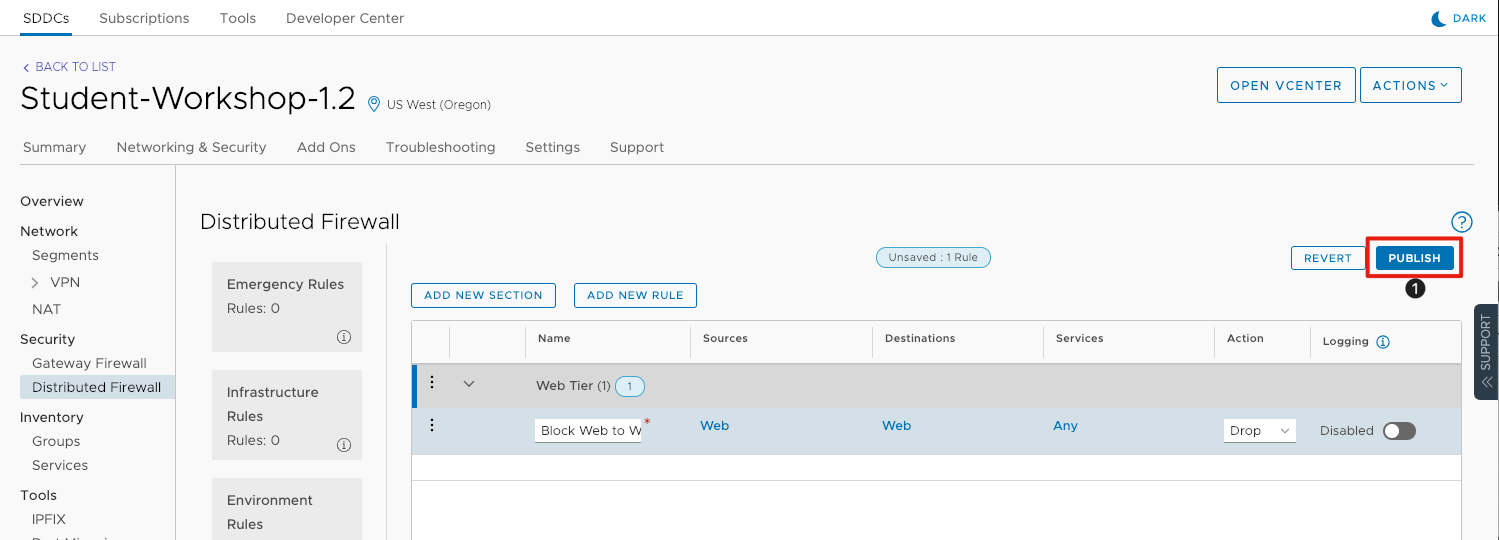
- Click Publish to commit the rule and begin blocking traffic between the web servers.
Testing the Distributed Firewall Rule
You should still have the console session opened from the previous exercise to webserver01 and it should be running a ping command.
- Click the Chrome Tab for webserver01.
- Ping webserver02 IP address 10.10.xx.xxx.
The pings should have stopped responding meaning that the distributed firewall rules have been correctly applied. This simple demonstration should give you an idea of the power of the distributed firewall.
Conclusion
In this module, we explored the setup of configuration of a VMware Cloud on AWS SDDC including utilizing the content library, deploying virtual machines, modifying firewall rules and working with virtual machines.
Single Host SDDC
If you like the Lab and want to continue experiment and test the VMware Cloud on AWS capabilities, please scan the QR Code below to start your 1-Host experience.

You have completed this module.
Please add comments below if you would like to give feedback on this exercise.
Feedback
Was this page helpful?
Glad to hear it! Please tell us how we can improve.
Sorry to hear that. Please tell us how we can improve.